Customer service had changed over the years from when the only option was to phone a call center during business hours to today, where customers expect 24/7 service via the telephone and other means. Some of those means are SMS/MMS messages, social media, communications apps (such as WhatsApp), and even voice assistants. Many customers today prefer to resolve most service issues independently without talking to someone and are used to getting answers instantly. So how does a business address customer demand in 2022 without hiring a development team to build these solutions?
Today, I wanted to bring to your attention Vonage AI Studio. It is a No Code / Low Code conversation AI platform that helps businesses handle complex customer interactions through voice and text. It starts with a friendly user interface where you can drag and drop modules to build a conversational Virtual Agent that your customers can use. No development team is required!
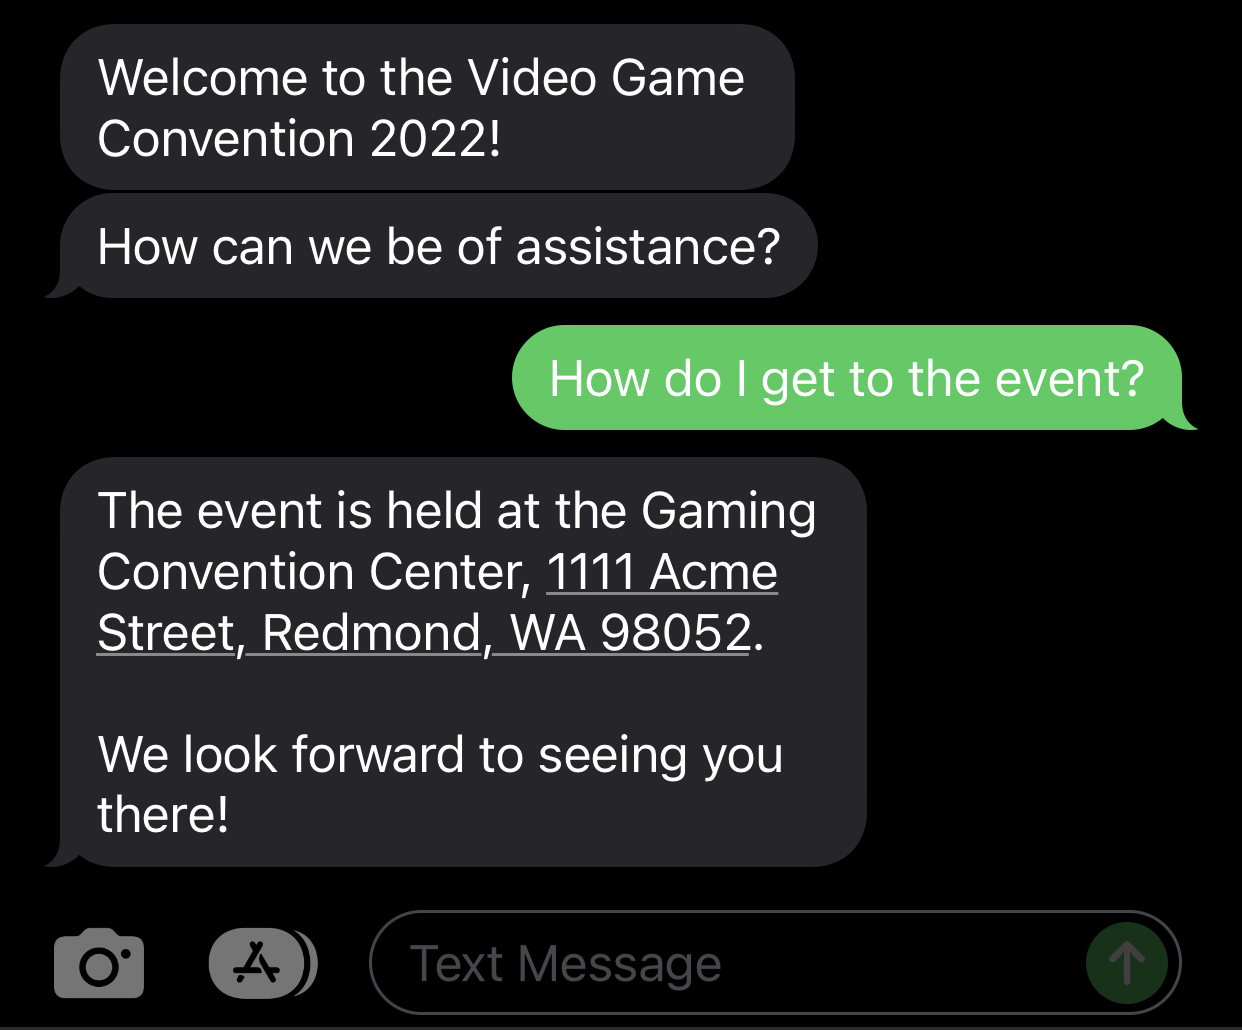
We will build a Virtual Agent for a fictitious event called the Video Game Convention 2022. In this scenario, a customer would be able to ask questions to get help regarding the logistics for the event, such as driving directions. Once the Virtual Agent is ready, we will test it via the built-in testing tool and finally publish it to try it live. Below is a screenshot once the Virtual Agent was published, and I am interacting with it via my iPhone through SMS messaging.
 iphone.jpg
To begin, you'll need to log into the Vonage Developer Portal first. If you don't have one, you can create one, and we'll give you free credit to play around with our APIs. Next, navigate the Vonage AI Studio home page and press the button to Create Agent. You will see an option of what type of Agent you would like to create.
 agent-creation.png
To begin, select the SMS agent and press Next as we want to create a text-based scenario that you can use on your mobile phone.
We will need to fill in some details here:
Region: Where will your Agent be typically used in - The USA or in Europe
Agent Name: Give your Agent a unique name that is meaningful to you. In our case, we will use VideoGameEvent.
API Key: This shows your API Key associated with your Vonage developer account.
Language: Select the language of your Agent.
Time Zone: Choose the time zone where your Agent will operate.
After completing the form, mine looks like this:
 agent-creation-completed.png
Next, there is the option to choose a template, and while there is not one for SMS, you can view some of the other templates available for different agent types. In this case, we will select Start from Scratch and press Next.
Finally, we have an option to Select Event. Events trigger your Agent, whether initiated by a user or the Agent itself. We will use an Inbound Session and press Create Agent for this example.
 agent-select-event.png
Next, you will see the main user interface of AI Studio! There is a node in the center of your screen called START.
 ai-studio-startscreen.png
The conversational flow starts here and has to be connected to other nodes for the Virtual Agent to know what to do next.
Quick Tip: I will show you some of the canvas features and functionality by following this tutorial, but I suggest exploring it on your own to understand it better.
We will begin by dragging and dropping a Send Message Conversation Node onto the canvas and entering a Welcome Message. Once complete, do not forget to press Save & Exit.
 send-message-1.png
Next, we need to connect the Conversation Node to the START node.
 connect-nodes.png
If we press the Tester button at the top right of the screen, then you can see your Virtual Agent in action!
 agent-in-action-1.png
While seeing the bot in action is terrific, it does not do much yet! We will fix that by dragging and dropping a Collect Input node.
 collect-input-node.png
A dialog box with several options will appear.
The first option to set is a Parameter. You can think of a Parameter as something that helps your agent extract and utilize specific information from the user input. Next, you will need to supply an Entity that will be specific to the various kinds of input your user will provide.
Select Parameter and click Create Parameter.
 create-parameter.png
We will give it the REQUEST name and assign it to @sys.any, allowing any type of user input, such as numbers, characters, and more.
 custom-parameters.png
Once you've added this information, press the GO BACK button and select your parameter name from the Parameter dropdown.
Next, under Message, you will see Prompt. This is where we will ask the user how we can help. Once complete, press the Save & Exit button to continue.
 collect-input-1.png
We will now use the Classifications node to understand what sort of help the user is asking for.
collect-input-node.png
First, we need to set the Classification Parameter to the parameter we created earlier, called REQUEST. Next, we need to select Intent and press the button to Create Intent to provide a list of questions a user can ask. For this sample, we will assume they want directions to the event.
 create-intent.png
Under User Expressions, enter a series of questions your user might ask. Here are the ones that I selected.
 training-set.png
Once complete, you might want to give the Intent a name, and I chose Directions for mine. Go ahead and press the Save & Go Back button to continue.
You will now need to select the Intent name and press the Save & Exit button to continue.
 completed-classification.png
Next, add another Send Message Conversation Node onto the canvas and enter a message you'd like the user to see if they are looking for directions. Once complete, don't forget to press Save & Exit.
 send-message-2.png
Finally, we will wrap up with an End Conversation Action. Drag and drop it onto your canvas to begin using it.
 end-conversation.png
Looking at the canvas now, you should note that the nodes are not connected, as shown by the orange line around each.
 before-canvas.png
When nodes are disconnected, the Virtual Agent doesn't know what to do next. Let's go ahead and fix that by joining the nodes, as shown below.
 after-canvas.png
Let's run the application by pressing the Tester button at the top right-hand corner of the screen and see what type of output we get. To begin, we see the welcome message along with the first question. The user might input, "I need directions to the event." The Virtual Agent responds with our indicated message, and the conversation ends.
 virtual-agent-conversation.png
But what happens if a user enters something the agent does not recognize? Something such as a "bowling ball."
 bowling-ball.png
As you can see, the agent does not have a path to follow. Let's fix that!
Add a Send Message Conversation Node onto the canvas and enter a message in case the Virtual Agent is unsure of the next steps. Once complete, don't forget to press Save & Exit.
 send-message-3.png
Now we should connect the Missed under the Classification 1 Node to our new message and join the output of Send Message 3 back to the Collect Input 1 node as shown below.
 completed-flow.png
If we rerun Tester and type in the same comment, the flow displays the assigned message and returns them to the Collect Input flow.
 bowling-ball-working.png
Now that you have a basic Virtual Agent setup, you could extend this project by adding additional questions that a user might enter. You also might want to try to publish the agent and test it with your cellphone! Whatever the case, we barely scratched the surface when it comes to the Vonage AI Studio
If you have questions or feedback, join us on the Vonage Developer Slack or send me a Tweet on Twitter, and I will get back to you. Thanks again for reading, and I will catch you on the next one!


Michael Crump works at Vonage on the Developer Experiences team and is a coder, YouTuber, and frequent speaker of various .NET and cloud/communication development topics. He’s passionate about helping developers understand the benefits of each in a no-nonsense way.
