Share:
Max is a former member of the Vonage Team. He was a Python Developer Advocate and Software Engineer, interested in communications APIs, machine learning, developer experience and dance! His training is in Physics, but now he works on open-source projects and makes stuff to make developers' lives better.
3 Ways to Make HTTP Calls with Python Requests (Beginner to Advanced)
The ability to make an HTTP request is essential to the way applications interact with the web. If you're using Python, whether you're building a web scraper, consuming RESTful APIs, or need to interact with the web in some other way, Python's third-party Requests module is the most popular and easy-to-use option. In this post, we'll explore three levels of HTTP requests with the Requests module, starting from the basics and building up to advanced techniques. By the end, you'll be ready to use Requests in production!
The higher-level code examples in this post come from the Vonage Python SDK, our SDK that lets you call APIs for messaging, voice, video, 2-factor authentication, and more, all using Python. We make use of the Requests module to do all of this and more, so it's the perfect example project for using Requests.
Let's level up our Requests game, starting with Level 1... right now!
At the foundational level, we have basic HTTP requests. These are the bread-and-butter of Python developers who need to interact with web services. The Requests module makes it incredibly easy to perform GET and POST requests, allowing you to retrieve web pages or send data to a server effortlessly.
First, install requests into a virtual environment of your choice:
Once you have your virtual environment activated and Requests installed, you can start using it straight away. Here's an example of a GET request to get the contents of a web page:
import requests

response = requests.get('https://example.com')
print(response.text)Running the above code should present you with the entire HTML of the https://example.com page. But we can do more than just get web pages with requests!
Here's a POST request, where we send data to a URL:
import requests

data = {'vonage': 'loves', 'python': '!'}
response = requests.post('https://httpbin.org/post', json=data)
print(response.json())We can see the response, serialized into a Python dictionary, below. Note that it includes the data we posted:
{'args': {}, 'data': '{"vonage": "loves", "python": "!"}', 'files': {}, 'form': {}, 'headers': {'Accept': '*/*', 'Accept-Encoding': 'gzip, deflate', 'Content-Length': '34', 'Content-Type': 'application/json', 'Host': 'httpbin.org', 'User-Agent': 'python-requests/2.31.0', 'X-Amzn-Trace-Id': 'Root=1-65012480-007aeecf146f5ff007c7678d'}, 'json': {'python': '!', 'vonage': 'loves'}, 'origin': '82.30.197.62', 'url': 'https://httpbin.org/post'}With these simple examples, you can already start making HTTP requests in Python. But what if you need to persist settings across multiple requests or share resources? That's where Level 2 comes in!
HTTP sessions are a way to persist settings across multiple requests to the same server. Sessions also use connection pooling, which means that if you make multiple HTTP calls to the same hosts, you'll use the same resources and can see significant performance improvements!
If either of these apply to you, you might want to use a session:
If you need to maintain a stateful connection, like when working with authenticated APIs or web applications.
If you make many requests to the same API/host and don't want to waste time and resources.
The Requests module provides a Session object that allows you to do just that. Here's an example:
import requests

# Create a session
session = requests.Session()

# Set headers to be sent in every request
session.headers.update({'Accepts': 'application/json'})

# Perform multiple requests within the same session
response1 = session.get('https://example.com/some-page')
response2 = session.get('https://example.com/some-other-page')Using a session like this means that any cookies we set will be persisted. We can also set default values for a session by adding them to the session object, as we did above with the header we sent. This is incredibly useful, but the main reason we use Session objects in the Vonage Python SDK is because it means that our users can make many API calls, very quickly.
Here's an example of the performance benefits of using an HTTP Session. The code below DOESN'T use a session, instead making 100 separate API calls to Vonage's Number Insight API to look up information for 100 different phone numbers and convert them to the international E.164 format:
import requests
import time

start_time = time.perf_counter()

number_conversions = {}
params = {'api_key': 'MY_API_KEY', 'api_secret': 'MY_API_SECRET', 'country': 'GB'}

for i in range(100):
    phone_number = str(1614960100 + i)
    params['number'] = phone_number

    with requests.get(
        'https://api.nexmo.com/ni/basic/json',
        params=params,
    ) as response:
        number_conversions[phone_number] = response.json()[
            'international_format_number'
        ]

elasped_time = time.perf_counter() - start_time
print(f'Time elapsed is: {elasped_time} seconds.')We get the following output: Time elapsed is: 11.103735665994463 seconds. So it took over 11 seconds to run 100 API calls, which isn't terrible, but could be much better.
I profiled the code above, here's an icicle plot visualization using snakeviz:
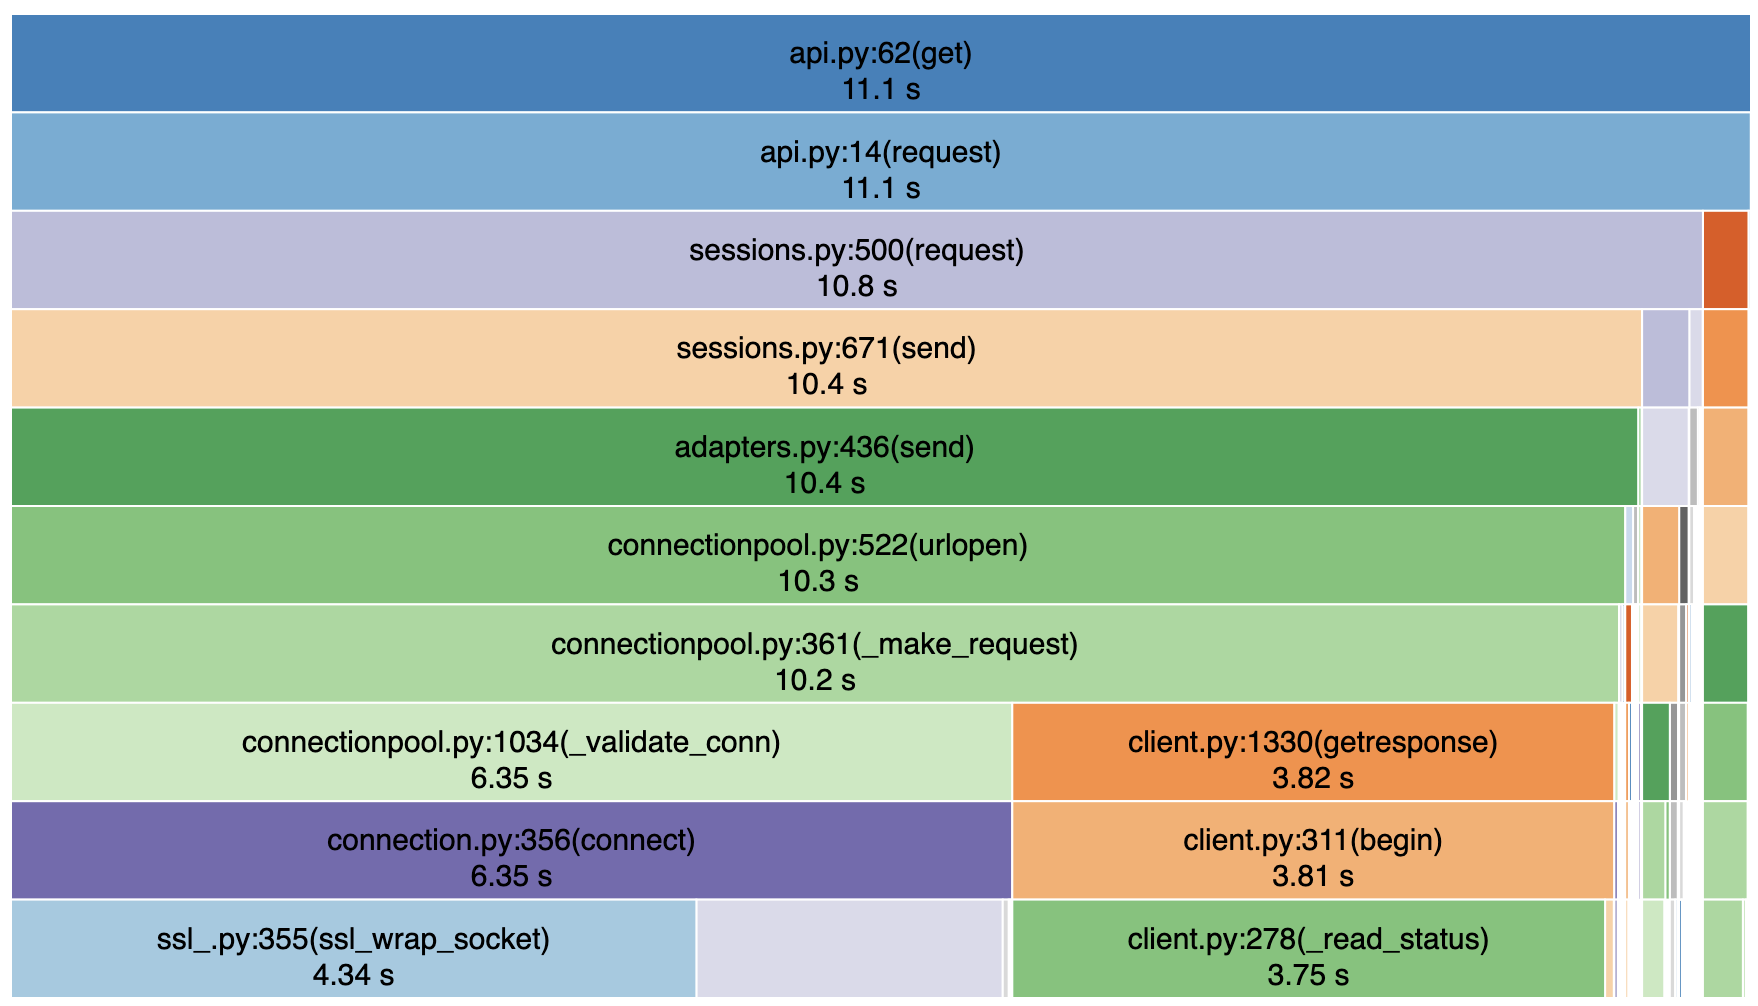 Vanilla requests icicle plot
We can see that we spent most of the time (more than 10/11 secs) on the connection pooling. Using a session to allow multiple HTTP calls to use common connection pooling and share resources should cut this down. Let's have a look.
If we use a session object for the Number Insight API calls, we can see the difference:
with requests.Session() as session:

    for i in range(100):
        phone_number = str(441614960100 + i)
        params['number'] = phone_number

        with session.get(
            'https://api.nexmo.com/ni/basic/json',
            params=params,
        ) as response:
            number_conversions[phone_number] = response.json()[
                'international_format_number'
]This time, we get this output: Time elapsed is: 4.058261167003366 seconds. which is almost three times faster! We can see in this icicle plot of the program that our system spent less time proportionally on connection pooling, and the time that was used was spent much more efficiently than when making 100 separate requests like we did above.
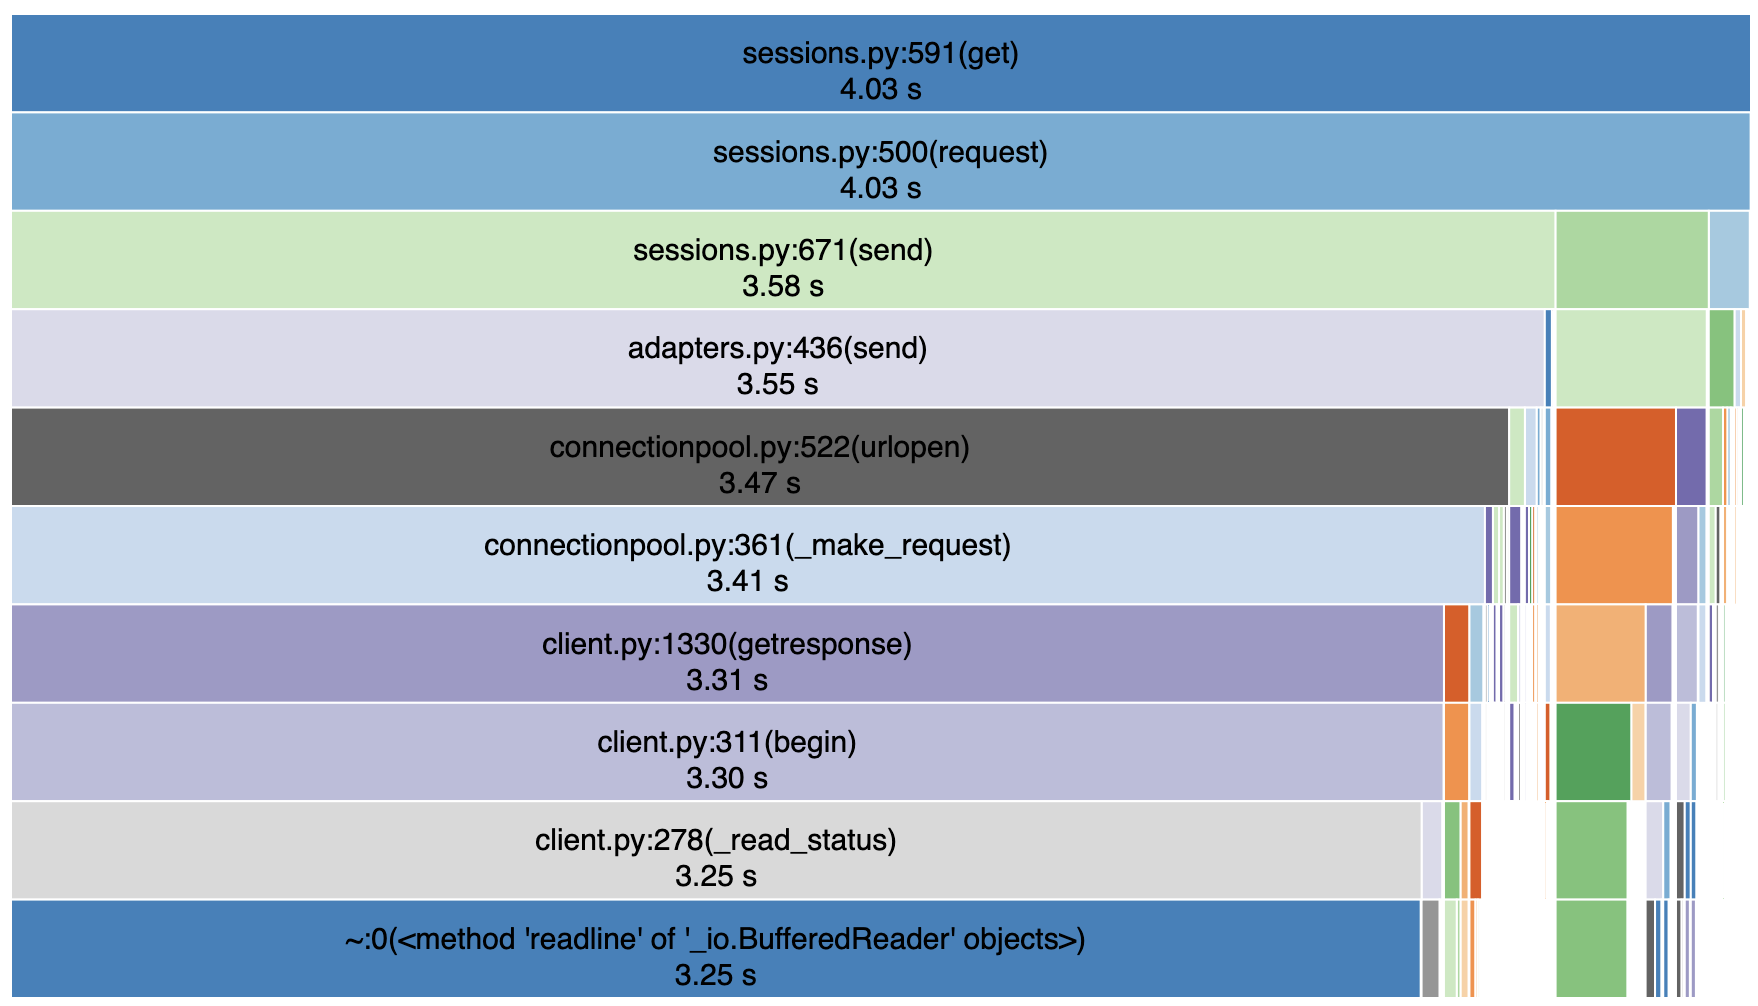 Session requests case icicle plot
So we can see that by using a session, you can automatically handle things like cookies and headers, making your code cleaner and more efficient. But what if you need even more control over your HTTP requests or want to fine-tune your connections? It's time for Level 3.
Now we're ready for the most advanced level, where we customize the behavior of HTTP requests at a very low level, including settings like connection pooling and retries. Requests allows us to set these low-level properties by using an HTTP adapter, which you can mount to a Session object to use your custom settings for the whole session. In Requests, we use an object called HTTPAdapter to do this.
Here's how you can use the HTTPAdapter object to configure custom settings:
import requests
from requests.adapters import HTTPAdapter

session = requests.Session()

# Create an HTTPAdapter object and configure connection pooling and retries
adapter = HTTPAdapter(pool_connections=20, pool_maxsize=5, max_retries=3)

# Mount the HTTPAdpater object to the session
session.mount('https://', adapter)

response = session.get('https://example.com')This can also be combined with request-specific values such as timeout (e.g. session.get('https://example.com', timeout=10)) to give fine-grained control per request.
Using an HTTP adapter gives control over how your HTTP requests are made, making it possible to fine-tune your application's behavior to meet your specific requirements.
In Vonage's Python SDK, we make use of all of these techniques to send requests in the most effective way. We use a session and allow users to configure request and HTTP adapter settings when they create a Client object. The code below shows how to run the same request as above, to make 100 Number Insight API calls, but this time uses the Vonage Python SDK to make the calls.
import vonage

client = vonage.Client(key='MY_API_KEY', secret='MY_API_SECRET')
number_conversions = {}

for i in range(100):
    phone_number = str(1614960100 + i)
    response = client.number_insight.get_basic_number_insight(
        country='GB', number=phone_number
    )
number_conversions[phone_number] = response['international_format_number']If you want to customize any of the defaults like pool_connections or request timeout, you can specify this when creating the client object.
The advantage of using the Vonage SDK to call Vonage APIs is that you don't have to worry about the request logic. You specify what you want to happen, and the SDK takes care of it for you. Many other services have SDKs in the same vein to abstract away logic that might not matter to you, but let you dive into the details if you need or want to.
In this blog post, we've explored the three levels of HTTP requests with Python's Requests module, from basic requests to advanced customization using sessions and HTTP adapters. By mastering these levels, you'll be well-equipped to tackle a wide range of web-related tasks in your Python projects.
Remember that each level builds upon the previous one, so start with the basics and progressively level up as your project's requirements evolve. HTTP requests are a fundamental aspect of web development, and with the Requests module, you have a powerful tool at your disposal to handle them effectively.
If you want to start using Vonage APIs, you can sign up for a free developer account (with free credits!)
If you have any questions about this article, feel free to reach out to us on our Vonage Community Slack and ask us over there, or by messaging us on X, previously known as Twitter.
So go ahead, experiment with different levels of HTTP requests, and empower your Python applications to interact with the web like a pro!
Share:
Max is a former member of the Vonage Team. He was a Python Developer Advocate and Software Engineer, interested in communications APIs, machine learning, developer experience and dance! His training is in Physics, but now he works on open-source projects and makes stuff to make developers' lives better.