
Share:
Atique is a computer graduate and proficient Python developer with a passion for exploring new technologies. With a strong background in programming and system engineering, he holds over 10 years of experience in automation, testing, and integration. His interests span single-board computers, software-defined radios, and continuous experimentation with generative AI tools.
ChatGPT WhatsApp Integration in 5 Easy Steps (How to Guide)
Time to read: 4 minutes
This article was updated by Benjamin Aronov in July 2025
WhatsApp is where a lot of people spend their time, whether it’s chatting with friends, family, or even businesses. And ChatGPT has become one of the easiest ways to build conversational experiences; not just on WhatsApp, but on Facebook Messenger too.
In this tutorial, we’ll show you how to connect the two: when someone sends a message on WhatsApp, your Python backend will forward it to ChatGPT, get a response, and send that back as a reply; all using the Vonage Messages API sandbox and a simple Flask app.
It’s a useful way to build a basic assistant, test out conversational ideas, or just see how these APIs fit together. We’ll also show how to extend it to send images using OpenAI’s image generation API (DALL-E) as a bonus.
By the end, you’ll have a working WhatsApp chatbot you can talk to using your sandbox number.
In this tutorial, you’ll need the following prerequisites to integrate ChatGPT with WhatsApp:
Vonage API Account
To complete this tutorial, you will need a DT API account. If you don’t have one already, you can sign up today and start building with free credit. Once you have an account, you can find your API Key and API Secret at the top of the DT API Dashboard.

Sign in to the Vonage Developer Dashboard. Then open the Messages Sandbox.
Scan the QR code to open WhatsApp and send the pre-filled message. Once you send the message, this will add your phone number to the allowlist.
Next, you’ll need to set up the webhooks for the sandbox to connect to our Flask app. For this, we have ngrok. So open your command-line terminal and run:
ngrok http 3000You now have your ngrok URL that looks something like:
Forwarding   https://ed95-77-137-44-66.ngrok-free.app
-> http://localhost:3000So now you can update the webhooks:
For Inbound:
https://YOUR_NGROK_URL/inboundFor Status:
https://YOUR_NGROK_URL/status
For more help, see Testing with ngrok.
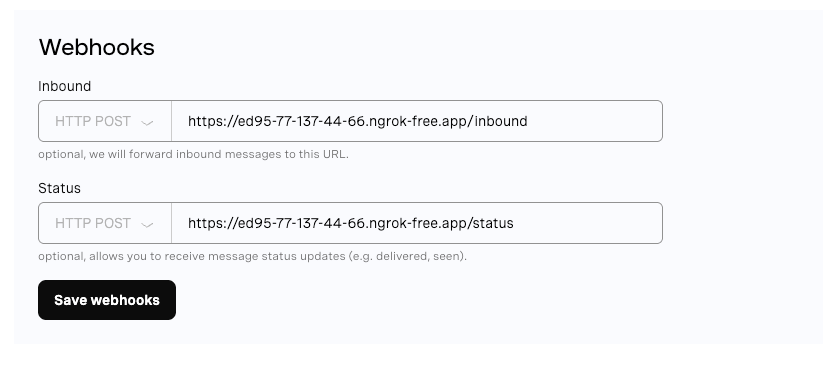 Configuring webhook URLs for inbound messages and status updates in the WhatsApp sandbox.
Need help with .env files? Check our Getting Started With Python Environment Variables guide for more help managing API keys securely.
Now that your sandbox is ready to send and receive WhatsApp messages, create your Flask app, which will handle the logic:
mkdir whatsapp-chatgpt-bot
cd whatsapp-chatgpt-botCreate a virtual environment for safe package and environment management. All the following terminal commands should be executed from inside the virtual environment.
python3 -m venv venv
source venv/bin/activateCreate our core Flask files:
touch main.py config.py .env requirements.txtInstall our project dependencies:
pip install flask requests openai python-dotenvAnd save them to our requirements file:
pip freeze > requirements.txtAdd your Vonage and OpenAI credentials to your .env file:
VONAGE_API_KEY=your_api_key
VONAGE_API_SECRET=your_secret

OPENAI_API_KEY=your_openai_key
>> See the Getting Started With Python Environment Variables video for more help.
You can then load your environment variables safely in the config.py file. Additionally, here your Vonage API Key and Secret are concatenated and encoded to be able to authenticate with the Vonage API.
from dotenv import load_dotenv
import os
import base64

load_dotenv()

VONAGE_API_KEY = os.getenv("VONAGE_API_KEY")
VONAGE_API_SECRET = os.getenv("VONAGE_API_SECRET")
VONAGE_SANDBOX_NUMBER = 14157386102

credentials = f"{VONAGE_API_KEY}:{VONAGE_API_SECRET}"
encoded_credentials = base64.b64encode(credentials.encode('utf-8')).decode('utf-8')
VONAGE_AUTH_HEADER = f"Basic {encoded_credentials}"

VONAGE_URL = "https://messages-sandbox.nexmo.com/v1/messages"

OPENAI_API_KEY = os.getenv("OPENAI_API_KEY")Finally, in our main.py file, let’s create our Flask server. This server has two endpoints, /inbound and /status, which correspond to the ones you set up earlier in your sandbox! So whenever something happens in the Vonage application, it will forward it to your Flask server, and then the logic here will be triggered.
import os
import json
import logging
from flask import Flask, request, Response
from config import *

app = Flask(__name__)
logging.basicConfig(format="%(message)s", level=logging.INFO)

@app.route('/status', methods=['POST'])
def message_status():
    data = request.get_json()
    logging.info(f"Status webhook received: {json.dumps(data)}")
    return Response(status=204)

@app.route('/inbound', methods=['POST'])
def inbound_message():
    data = request.get_json()
    logging.info(f"Inbound message: {json.dumps(data)}")

    return Response(status=200)

if __name__ == "__main__":
    port = int(os.environ.get("PORT", 3000))
app.run(host="0.0.0.0", port=port)You can now test that the sandbox is receiving your messages and forwarding them to the Flask app. In a tab separate from your ngrok, run your Flask server:
chmod 666 main.py
export FLASK_ENV=development
export FLASK_APP=main.py
python3 main.py -p 3000
And you should see your messages logged to the server!
Now let’s create some logic to parse the inbound WhatsApp messages from Vonage, identify the user and message content, and send a response in WhatsApp.
First, let’s create a new file to store all of our logic:
touch chatbot_utils.pyInside chatbot_utils.py add the following:
import os
import json
import requests
from   config import *
from openai import OpenAI

# OpenAI setup using SDK v1.x
client = OpenAI(api_key=OPENAI_API_KEY)

def send_whatsapp_text(to, text):
    payload = {
        "from": VONAGE_SANDBOX_NUMBER,
        "to": to,
        "channel": "whatsapp",
        "message_type": "text",
        "text": text
    }
    _post_to_vonage(payload)


def _post_to_vonage(payload):
    headers = {
        "Content-Type": "application/json",
        "Accept": "application/json",
        "Authorization": VONAGE_AUTH_HEADER
    }
    response = requests.post(VONAGE_URL, headers=headers, data=json.dumps(payload))
    response.raise_for_status()
And then update your main.py file to import our new functions, below the previous imports add:
from chatbot_utils import *And update the /inbound endpoint in main.py to now get the sender and use our send_whatsapp_text function:
@app.route('/inbound', methods=['POST'])
def inbound_message():
    data = request.get_json()
    logging.info(f"Incoming message:\n{json.dumps(data, indent=2)}")

    try:
        sender = data['from']
        text = data.get('text', '').strip()

        if not text:
            logging.warning("No text in incoming message. Skipping.")
            return Response(status=204)

       response_text = f"I've received your question! You asked: \n \n {text}"
       send_whatsapp_text(sender, response_text)

    except Exception as e:
        logging.error(f"Error processing inbound message: {e}", exc_info=True)
        return Response("Error", status=500)

return Response(status=200)You can now restart your Flask server and test the new code out! You should have your question repeated back to you.
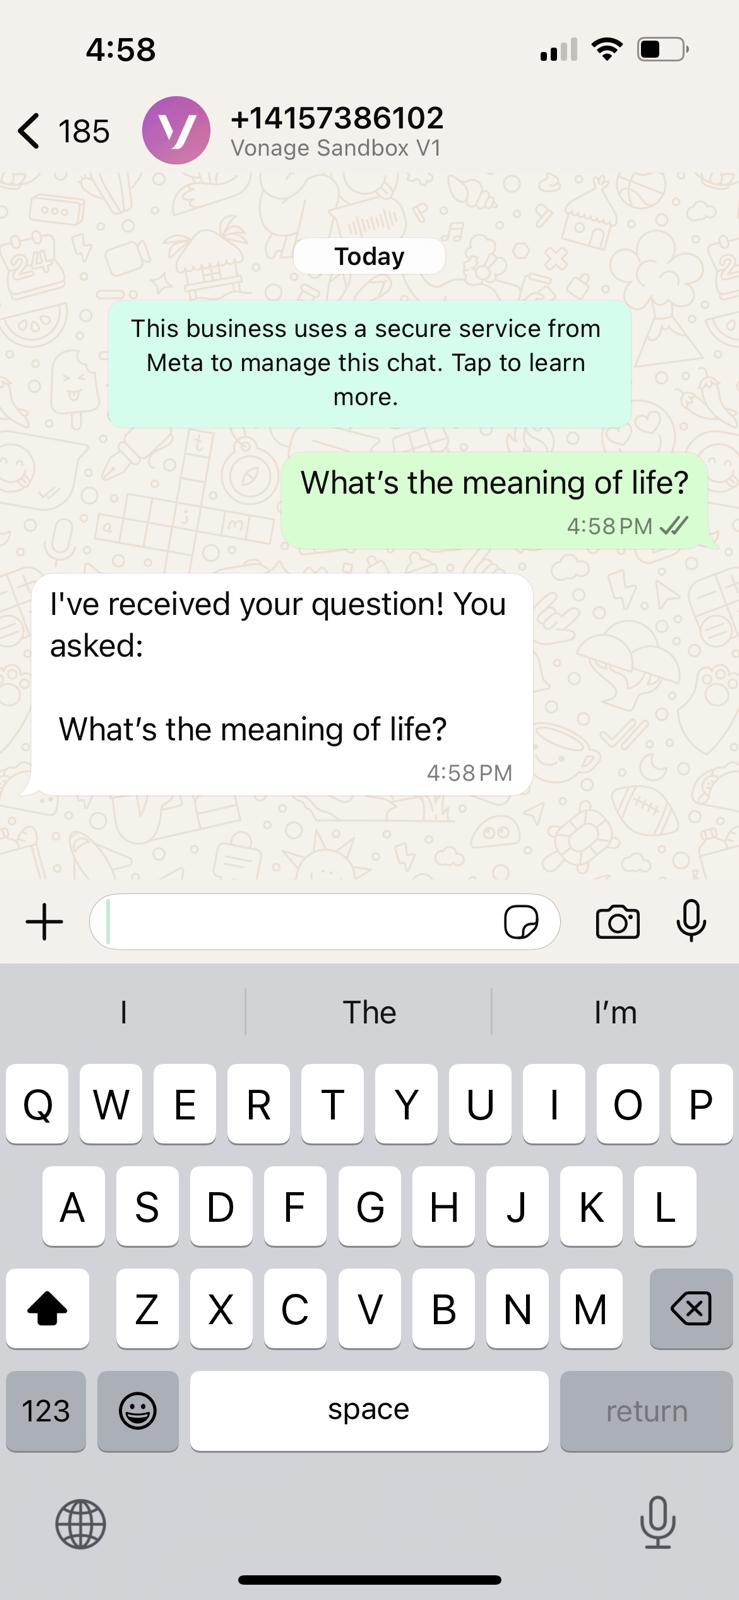 A WhatsApp chat showing the Vonage Sandbox confirming receipt of a user's question about the meaning of life.
Our last step is to call the OpenAI API, passing the user’s message, and then handling the response to WhatsApp.Inside chatbot_utils.py add the following function:
def generate_chatgpt_reply(prompt):
    response = client.chat.completions.create(
        model="gpt-4o",
        messages=[
            {"role": "system", "content": "You are a helpful assistant."},
            {"role": "user", "content": prompt}
        ]
    )
return response.choices[0].message.content.strip()And you can now use it by updating the /inbound endpoint:
@app.route('/inbound', methods=['POST'])
def inbound_message():
    data = request.get_json()
    logging.info(f"Incoming message:\n{json.dumps(data, indent=2)}")

    try:
        sender = data['from']
        text = data.get('text', '').strip()

        if not text:
            logging.warning("No text in incoming message. Skipping.")
            return Response(status=204)

        # Generate reply using ChatGPT
        reply = generate_chatgpt_reply(text)
        logging.info(f"ChatGPT reply: {reply}")

        # Send response via WhatsApp
        send_whatsapp_text(sender, reply)

    except Exception as e:
        logging.error(f"Error processing inbound message: {e}", exc_info=True)
        return Response("Error", status=500)

    return Response(status=200)
Now you can (re)start your Flask server:
chmod 666 main.py
export FLASK_ENV=development
export FLASK_APP=main.py
python3 main.py -p 3000And send a question to the WhatsApp Sandbox phone number. You will now get a response from ChatGPT!
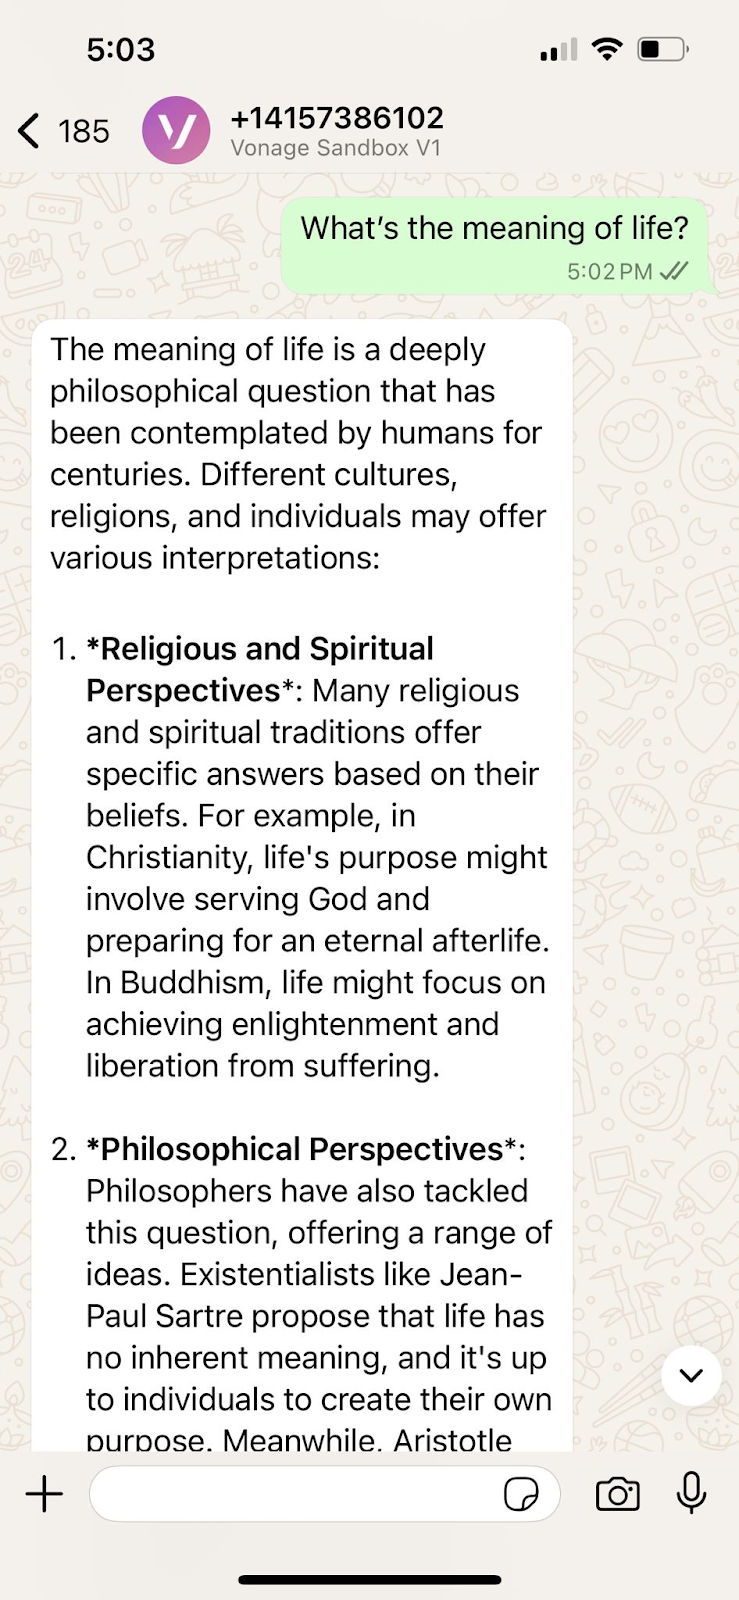 WhatsApp chatbot responds to a user question with a detailed explanation generated by ChatGPT.
Awesome! You’ve added text generation with an LLM using OpenAI’s GPT-4o model. But you can also generate and send AI images using OpenAI’s DALL-E model. Let’s extend our app by detecting when a user sends a prompt starting with “IMAGE:”, we can call DALL-E to generate a picture, then deliver it back to the user on WhatsApp with a caption.
In your chatbot_utils.py file, add the following two functions, send_whatsapp_image and generate_image_from_prompt :
def send_whatsapp_image(to, image_url, caption="Image"):
    payload = {
        "from": VONAGE_SANDBOX_NUMBER,
        "to": to,
        "channel": "whatsapp",
        "message_type": "image",
        "image": {
            "url": image_url,
            "caption": caption
        }
    }
    _post_to_vonage(payload)


def generate_image_from_prompt(prompt):
    response = client.images.generate(
        model="dall-e-3",
        prompt=prompt,
        size="1024x1024",
        n=1
    )
return response.data[0].urlAnd lastly, we’ll need to update our /inbound endpoint to decipher if the user has sent an image request or a regular question:
@app.route('/inbound', methods=['POST'])
def inbound_message():
    data = request.get_json()
    logging.info(f"Incoming message:\n{json.dumps(data, indent=2)}")

    try:
        sender = data['from']
        text = data.get('text', '').strip()

        if not text:
            logging.warning("No text in incoming message. Skipping.")
            return Response(status=204)

        if text.upper().startswith("IMAGE:"):
            prompt = text[6:].strip()
            logging.info(f"Image prompt: {prompt}")
            image_url = generate_image_from_prompt(prompt)
            send_whatsapp_image(sender, image_url, caption=prompt)
        else:
            reply = generate_chatgpt_reply(text)
            logging.info(f"ChatGPT reply: {reply}")
            send_whatsapp_text(sender, reply)

    except Exception as e:
        logging.error(f"Error processing inbound message: {e}", exc_info=True)
        return Response("Error", status=500)

return Response(status=200)Boot your server up again and try to generate some AI images!
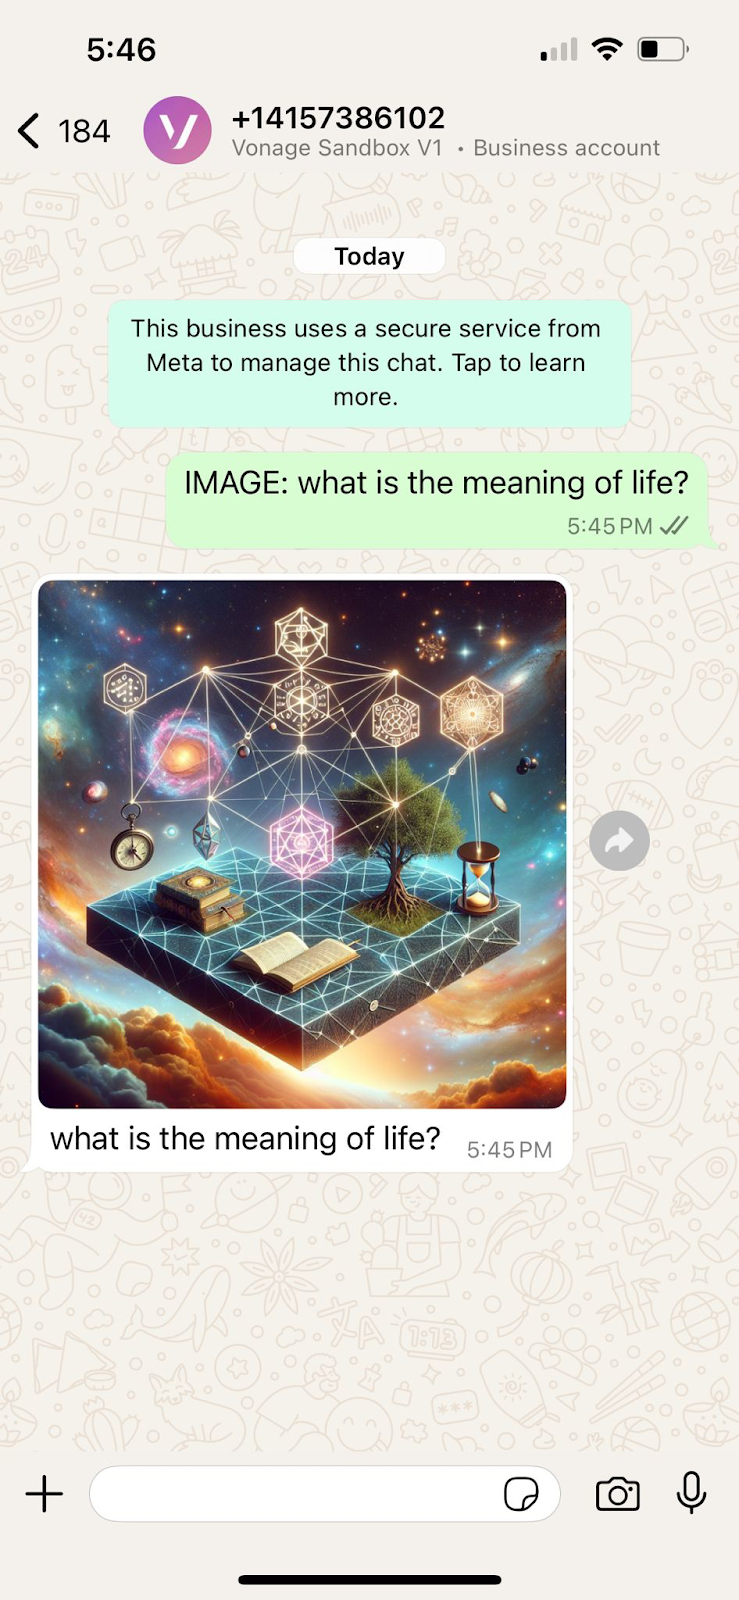 A DALL·E-generated image sent in response to the prompt 'What is the meaning of life?' via Vonage WhatsApp Sandbox
Nice job! Successfully building a working WhatsApp chatbot that connects to ChatGPT for natural text replies and even generates images using DALL-E was awesome! This was a great jumping-off point to experiment with LLMs.
From here, you could add custom system prompts, log user inputs for training, handle more structured commands, or even route messages to human agents. The combination of OpenAI and Vonage’s Messages API opens up a lot of possibilities.
You’ll also want to move out of the Sandbox and to a full Vonage application. Replace direct API calls with the Vonage Python SDK for better error handling and maintainability. This will allow you to easily add validation for incoming webhooks to ensure they're genuinely from Vonage, preventing potential security vulnerabilities.
If you build something cool, we want to hear about it! Join us in the Vonage Developer Slack, or tag us on X (formerly Twitter).
Share:
Atique is a computer graduate and proficient Python developer with a passion for exploring new technologies. With a strong background in programming and system engineering, he holds over 10 years of experience in automation, testing, and integration. His interests span single-board computers, software-defined radios, and continuous experimentation with generative AI tools.