Share:
Abdul is a Developer Advocate for Vonage. He has a background working in consumer products as an iOS Engineer. In his spare time, he enjoys biking, listening to music and mentoring those who are just beginning their journey in tech
How To Handle VoIP Push Notifications using iOS Callkit
Time to read: 7 minutes
In this tutorial, you will use CallKit to handle the VoIP push notifications sent to an iOS device when using the Vonage Client SDK for iOS. VoIP push notifications are the primary method for receiving inbound calls with the Client SDK since they will reach the device regardless of whether your application is in the foreground or not. CallKit allows you to integrate your iOS application into the system so your application can look like a native iOS phone call. Using the Vonage Client SDK with Callkit will allow you to build calling into your application while having a consistent and familiar interface for inbound calls.
A Vonage API account. If you don't have one already, you can sign up today.
An Apple Developer account and an iOS device (or simulator in Xcode 14 and above).
A GitHub account.
Xcode 12 and Swift 5 or greater.
Cocoapods to install the Vonage Client SDK for iOS.
Our Command Line Interface. You can install it with
npm install -g @vonage/cli.
This blog will be building on top of the "Receiving a phone call in-app" from the Vonage developer portal. This tutorial will start from the finished state of the tutorial project. Either follow along, or if you are already familiar with building a Vonage Client SDK voice application, you can clone the starter project from GitHub.
There are two types of push notifications that you can use in an iOS app, VoIP pushes with PushKit or User Notifications. This tutorial will be focusing on VoIP pushes. Apple Push Notifications service (APNs) uses certificate-based authentication to secure the connections between APNs and Vonage servers. So you will need to create a certificate and upload it to the Vonage Servers so Vonage can send a push to the device when there is an incoming call.
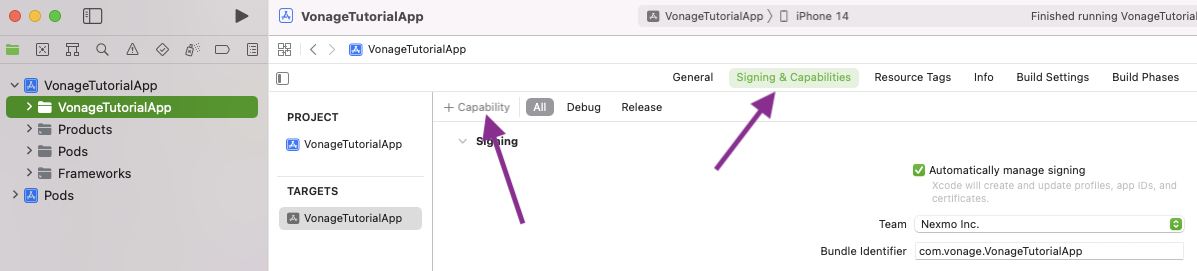
To use push notifications, you are required to add the push notification capability to your Xcode project. Make sure you are logged into your Apple developer account in Xcode via preferences. If so, select your target and then choose Signing & Capabilities:
Then select add capability and add the Push Notifications and Background Modes capabilities:
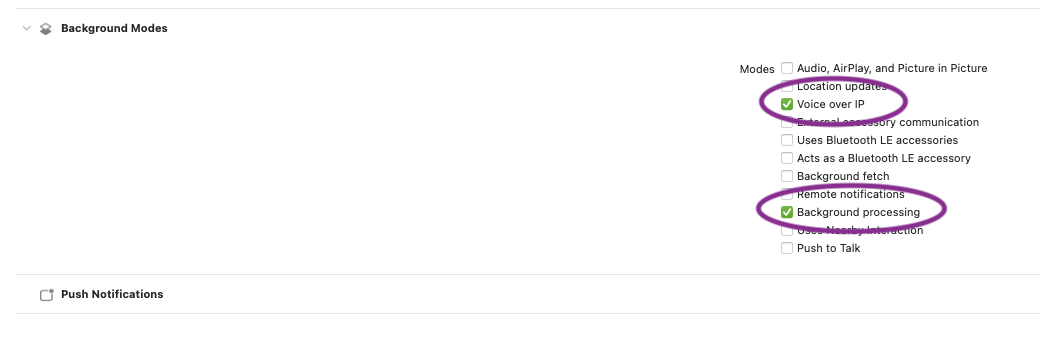
Under the Background Modes capability, select Voice over IP and Background processing. If Xcode is automatically managing the signing of your app it will update the provisioning profile linked to your Bundle Identifier to include the capabilities.
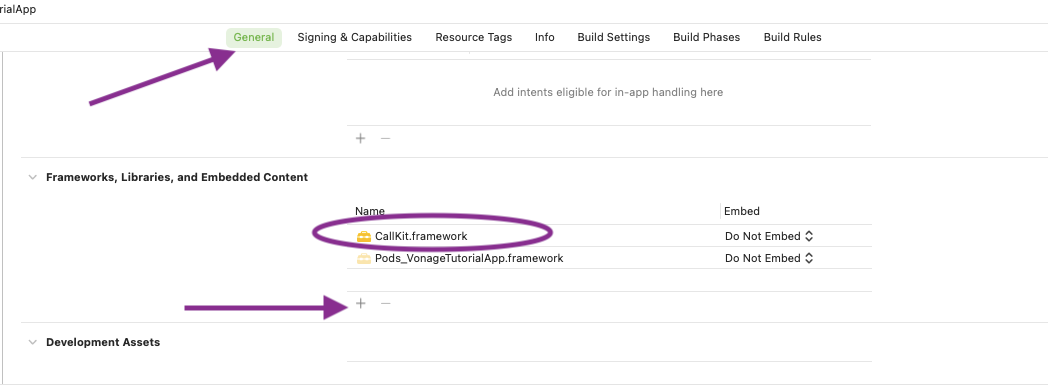
When using VoIP push notifications, you have to use the CallKit framework. Link it to your project by adding it under Frameworks, Libraries, and Embedded Content under General:
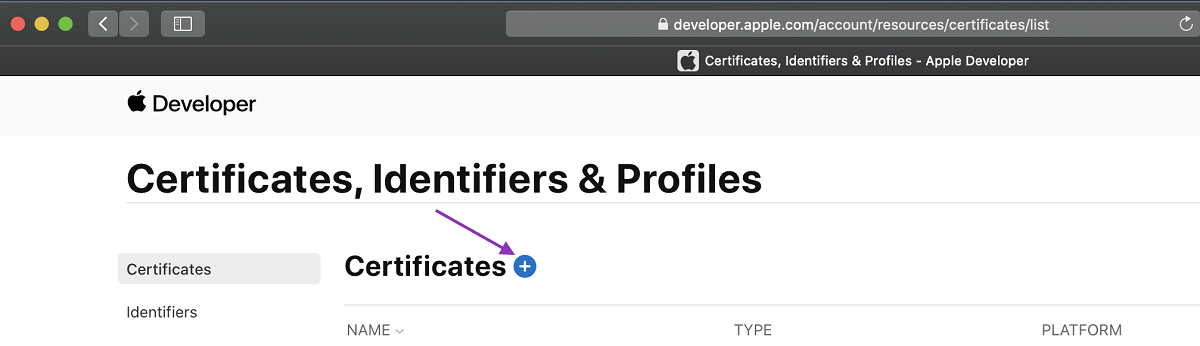
To generate a push certificate, you will need to log in to your Apple developer account and head to the Certificates, Identifiers & Profiles page and add a new certificate:
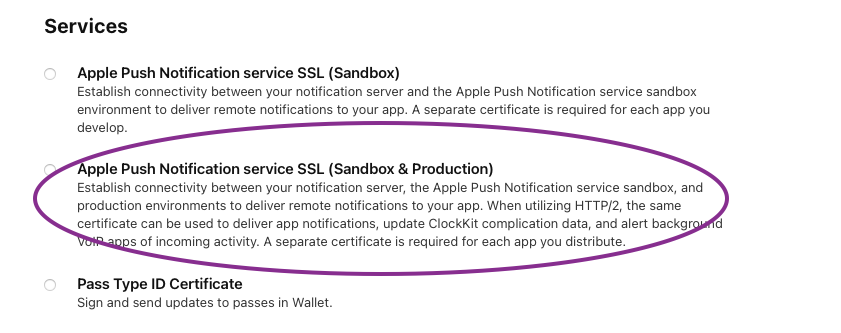
Choose Apple Push Notification service SSL (Sandbox & Production) and continue.
You will now need to choose the App ID for the app that you want to add VoIP push notifications to and continue. If your app is not listed, you will have to create an App ID. Xcode can do this for you if it automatically manages your signing. Otherwise, you can create a new App ID on the Certificates, Identifiers & Profiles page under Identifiers. Make sure to select the push notifications capability when doing so.
You will be prompted to upload a Certificate Signing Request (CSR). You can follow the instructions on Apple's help website to create a CSR on your Mac. Once the CSR is uploaded, you will be able to download the certificate. Double-click the .cer file to install it in Keychain Access.
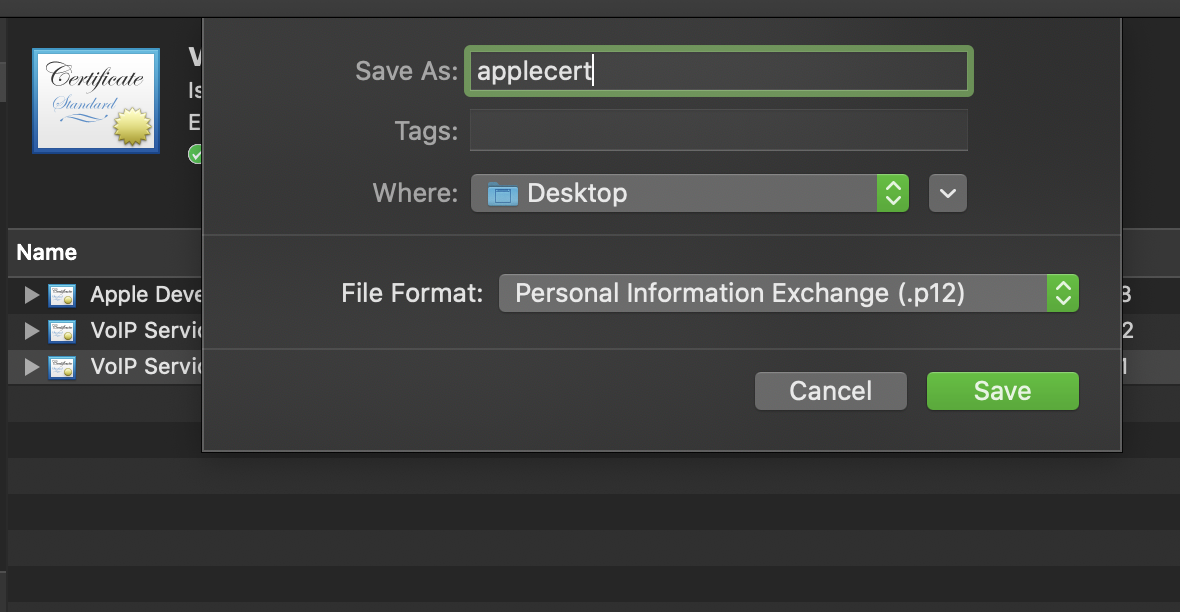
To get the push certificate in the format that is needed by the Vonage servers, you will need to export it. Locate your VoIP Services certificate in Keychain Access and right-click to export it. Name the export applecert and select .p12 as the format:
You upload your certificate to Vonage using the API Dashboard. Open your application on the dashboard, then open the "Enable push notifications" tab:
 Push Upload on the dashboard
You can upload your certificate .p12 from the previous step and add a password if needed.
Create a new Swift file (CMD + N) and call it ClientManager. This class will encapsulate the code needed to interface with the Client SDK since you will need to get information from the Client SDK in multiple places in future steps:
Replace ALICE_JWT with the JWT you generated earlier, in a production environment this is where you would fetch a JWT from your authentication server/endpoint.
With this new class, you will need to move the call Client SDK code from the ViewController class to the ClientManager class. The two classes will communicate with the ClientManagerDelegate observers. Make the following changes to your ViewController class:
class ViewController: UIViewController {

    private let connectionStatusLabel = UILabel()

    override func viewDidLoad() {
        super.viewDidLoad()
        // Do any additional setup after loading the view.

        ClientManager.shared.delegate = self

        connectionStatusLabel.text = ""
        connectionStatusLabel.textAlignment = .center
        connectionStatusLabel.translatesAutoresizingMaskIntoConstraints = false

        view.addSubview(connectionStatusLabel)

        view.addConstraints([
            connectionStatusLabel.topAnchor.constraint(equalTo: view.safeAreaLayoutGuide.topAnchor, constant: 20),
            connectionStatusLabel.centerXAnchor.constraint(equalTo: view.centerXAnchor)
        ])
    }
}

extension ViewController: ClientManagerDelegate {
    func clientStatusUpdated(_ clientManager: ClientManager, status: String) {
        DispatchQueue.main.async {
            self.connectionStatusLabel.text = status
        }
    }
}
The next step is to register a device for push notifications to let Vonage know which device to send the push notification to for which user. In the ClientManager class add the pushToken property and the following functions to handle the push token of the device:
final class ClientManager: NSObject {
    public var pushToken: Data?
    weak var delegate: ClientManagerDelegate?
    ...

    func invalidatePushToken(_ completion: (() -> Void)? = nil) {
        print("VPush: Invalidate token")
        if let deviceId = UserDefaults.standard.object(forKey: Constants.deviceId) as? String {
            client.unregisterDeviceTokens(byDeviceId: deviceId) { error in
                if error == nil {
                    self.pushToken = nil
                    UserDefaults.standard.removeObject(forKey: Constants.pushToken)
                    UserDefaults.standard.removeObject(forKey: Constants.deviceId)
                    completion?()
                }
            }
        } else {
            completion?()
        }
    }

    private func registerPushIfNeeded(with token: Data) {
        shouldRegisterToken(with: token) { shouldRegister in
            if shouldRegister {
                self.client.registerVoipToken(token, isSandbox: true) { error, deviceId in
                    if error == nil {
                        print("VPush: push token registered")
                        UserDefaults.standard.setValue(token, forKey: Constants.pushToken)
                        UserDefaults.standard.setValue(deviceId, forKey: Constants.deviceId)
                    } else {
                        print("VPush: registration error: \(String(describing: error))")
                        return
                    }
                }
            }
        }
    }

    private func shouldRegisterToken(with token: Data, completion: @escaping (Bool) -> Void) {
        let storedToken = UserDefaults.standard.object(forKey: Constants.pushToken) as? Data

        if let storedToken = storedToken, storedToken == token {
            completion(false)
            return
        }

        invalidatePushToken {
            completion(true)
        }
}The registerPushIfNeeded function takes a token and then uses the shouldRegisterToken function to check if the token has already been registered. If it has not, registerVoipToken on the client will register the push notification with Vonage. In the AppDelegate class, you can now register for VoIP push notifications. Import PushKit at the top of the file:
import PushKitAdd a local instance of the ClientManager class:
class AppDelegate: UIResponder, UIApplicationDelegate {
    ...
    private let clientManager = ClientManager.shared
    ...
}Create a new extension at the end of the file which contains a function to register the device for push notifications:
extension AppDelegate: PKPushRegistryDelegate {
    func registerForVoIPPushes() {
        let voipRegistry = PKPushRegistry(queue: nil)
        voipRegistry.delegate = self
        voipRegistry.desiredPushTypes = [PKPushType.voIP]
    }
}Update the didFinishLaunchingWithOptions function to call the registerForVoIPPushes function and log in to the Client SDK:
func application(_ application: UIApplication, didFinishLaunchingWithOptions launchOptions: [UIApplication.LaunchOptionsKey: Any]?) -> Bool {
    // Override point for customization after application launch.
    AVAudioSession.sharedInstance().requestRecordPermission { (granted:Bool) in
        print("Allow microphone use. Response: \(granted)")
    }
    registerForVoIPPushes()
    clientManager.login()
    return true
}Add the PKPushRegistryDelegate functions to handle the push notification registration to the extension:
extension AppDelegate: PKPushRegistryDelegate {
    ...

    func pushRegistry(_ registry: PKPushRegistry, didUpdate pushCredentials: PKPushCredentials, for type: PKPushType) {
        clientManager.pushToken = pushCredentials.token
    }

    func pushRegistry(_ registry: PKPushRegistry, didInvalidatePushTokenFor type: PKPushType) {
        clientManager.invalidatePushToken(nil)
    }
}The push token is stored as a property on the ClientManager class as you only want to register the token with Vonage when the client is logged in so edit the login function in the ClientManager class to handle this:
func login(isPushLogin: Bool = false) {
    print("VPush: Login - isPush:", isPushLogin)
    guard !isActiveCall else { return }

    ongoingPushLogin = isPushLogin

    getJWT { jwt in
        self.client.createSession(jwt) { error, sessionID in
            let statusText: String
            if error == nil {
                statusText = "Connected"

                if isPushLogin {
                    self.handlePushLogin()
                } else {
                    self.handleLogin()
                }
            } else {
                statusText = error!.localizedDescription
            }

            self.delegate?.clientStatusUpdated(self, status: statusText)
        }
    }
}

private func handlePushLogin() {
    ongoingPushLogin = false

    if let storedAction = storedAction {
        storedAction()
    }
}

private func handleLogin() {
    if let token = pushToken {
        registerPushIfNeeded(with: token)
    }
}
With the device registered, it can now receive push notifications from Vonage. The Client SDK has functions for checking if a push notification payload is the expected payload and for processing the payload. When processCallInvitePushData is called, it converts the payload into a call that is received on the didReceiveInviteForCall function of the VGVoiceClientDelegate.
Like registering a push token, you only want to process an incoming push when the Client SDK has been logged in. Implement the functions on the ClientManager class alongside a local variable to store an incoming push:
final class ClientManager: NSObject {
    ...

    private var ongoingPushLogin = false
    private var ongoingPushKitCompletion: () -> Void = { }
    private var storedAction: (() -> Void)?

    ...

    func isVonagePush(with userInfo: [AnyHashable : Any]) -> Bool {
        VGVoiceClient.vonagePushType(userInfo) == .unknown ? false : true
    }

    func processPushPayload(with payload: [AnyHashable : Any], pushKitCompletion: @escaping () -> Void) -> String? {
        self.ongoingPushKitCompletion = pushKitCompletion
        return client.processCallInvitePushData(payload)
    }

    ...
}The PKPushRegistryDelegate has a function that is called when there is an incoming push called didReceiveIncomingPushWith add it to the extension PKPushRegistryDelegate in the AppDelegate.swift file:
func pushRegistry(_ registry: PKPushRegistry, didReceiveIncomingPushWith payload: PKPushPayload, for type: PKPushType, completion: @escaping () -> Void) {
    if clientManager.isVonagePush(with: payload.dictionaryPayload) {
        clientManager.login(isPushLogin: true)
        _ = clientManager.processPushPayload(with: payload.dictionaryPayload, pushKitCompletion: completion)
    }
}It is recommended that you perform a login when you have an incoming VoIP push notification which is why login is called here. This uses the logic in the ClientManager class that stores information about a push to be used after the login has been completed. The logic will be implemented at a later stage.
When your iOS application has an incoming VoIP push notification, you must handle it using the CXProvider class in the CallKit framework. Create a new Swift file (CMD + N) called ProviderDelegate:
import CallKit
import AVFoundation
import VonageClientSDKVoice

final class ProviderDelegate: NSObject {
    private let provider: CXProvider
    private let callController = CXCallController()
    private var activeCall: UUID? = nil

    override init() {
        provider = CXProvider(configuration: ProviderDelegate.providerConfiguration)
        super.init()
        provider.setDelegate(self, queue: nil)
    }

    static var providerConfiguration: CXProviderConfiguration = {
        let providerConfiguration = CXProviderConfiguration()
        providerConfiguration.maximumCallsPerCallGroup = 1
        providerConfiguration.supportedHandleTypes = [.generic, .phoneNumber]
        return providerConfiguration
    }()
}The callController property is a CXCallController object used by the class to handle user actions on the CallKit UI. Next, create an extension at the end of the file to implement the CXProviderDelegate:
extension ProviderDelegate: CXProviderDelegate {
   func providerDidReset(_ provider: CXProvider) {
        activeCall = nil
    }

    func provider(_ provider: CXProvider, perform action: CXAnswerCallAction) {
        ClientManager.shared.answer(activeCall!.uuidString.lowercased()) { error in
            if error == nil {
                action.fulfill()
            } else {
                action.fail()
            }
        }
    }

    func provider(_ provider: CXProvider, perform action: CXEndCallAction) {
        hangup(action: action)
    }

    func provider(_ provider: CXProvider, didActivate audioSession: AVAudioSession) {
        VGVoiceClient.enableAudio(audioSession)
    }

    func provider(_ provider: CXProvider, didDeactivate audioSession: AVAudioSession) {
        VGVoiceClient.disableAudio(audioSession)
    }
}When CallKit activates and deactivates the audio session, the delegate functions enable and disable the Client SDK audio using the CallKit audio session.
When the CallKit UI answers the call, it calls the CXAnswerCallAction delegate function. This calls the answer function that you will implement on the ClientManager in a future step.
CXEndCallAction gets called when the call is ended from the CallKit UI which calls the hangup function that you will implement next. Implement the remainder of the functions needed in the ProviderDelegate class:
final class ProviderDelegate: NSObject {
    ...

    func reportCall(_ callID: String, caller: String, completion: @escaping () -> Void) {
        activeCall = UUID(uuidString: callID)
        let update = CXCallUpdate()
        update.localizedCallerName = caller

        provider.reportNewIncomingCall(with: activeCall!, update: update) { error in
            if error == nil {
                completion()
            }
        }
    }

    func didReceiveHangup(_ callID: String) {
        let uuid = UUID(uuidString: callID)!
        provider.reportCall(with: uuid, endedAt: Date.now, reason: .remoteEnded)
    }

    func reportFailedCall(_ callID: String) {
        let uuid = UUID(uuidString: callID)!
        provider.reportCall(with: uuid, endedAt: Date.now, reason: .failed)
    }

    private func hangup(action: CXEndCallAction) {
        if activeCall == nil {
            endCallTransaction(action: action)
        } else {
            ClientManager.shared.reject(activeCall!.uuidString.lowercased()) { error in
                if error == nil {
                    self.endCallTransaction(action: action)
                }
            }
        }
    }

    private func endCallTransaction(action: CXEndCallAction) {
        self.callController.request(CXTransaction(action: action)) { error in
            if error == nil {
                self.activeCall = nil
                action.fulfill()
            } else {
                action.fail()
            }
        }
    }
}The reportCall function calls reportNewIncomingCall which triggers the CallKit system UI, the other functions help to either update or end calls. Now that the ProviderDelegate class is complete, you can update the ClientManager class to use it. Add the providerDelegate property to the client manager:
final class ClientManager: NSObject {
    ...

    private let providerDelegate = ProviderDelegate()

    ...
}Then implement the VGVoiceClientDelegate:
extension ClientManager: VGVoiceClientDelegate {
    func voiceClient(_ client: VGVoiceClient, didReceiveInviteForCall callId: VGCallId, from caller: String, with type: VGVoiceChannelType) {
        print("VPush: Received invite", callId)
        providerDelegate.reportCall(callId, caller: caller, completion: ongoingPushKitCompletion)
    }

    func voiceClient(_ client: VGVoiceClient, didReceiveHangupForCall callId: VGCallId, withQuality callQuality: VGRTCQuality, reason: VGHangupReason) {
        print("VPush: Received hangup")
        isActiveCall = false
        providerDelegate.didReceiveHangup(callId)
    }

    func voiceClient(_ client: VGVoiceClient, didReceiveInviteCancelForCall callId: String, with reason: VGVoiceInviteCancelReason) {
        print("VPush: Received invite cancel")
        providerDelegate.reportFailedCall(callId)
    }

    func client(_ client: VGBaseClient, didReceiveSessionErrorWith reason: VGSessionErrorReason) {
        let reasonString: String!

        switch reason {
        case .tokenExpired:
            reasonString = "Expired Token"
        case .pingTimeout, .transportClosed:
            reasonString = "Network Error"
        default:
            reasonString = "Unknown"
        }

        delegate?.clientStatusUpdated(self, status: reasonString)
    }
}After the SDK has processed the call, you will get a call invite on the didReceiveInviteForCall delegate function, which will, in turn, report the call. didReceiveHangupForCall and didReceiveInviteCancelForCall also call their respective functions on the provider delegate. To complete the ClientManager class, add the answer and reject functions:
func answer(_ callID: String, completion: @escaping (Error?) -> Void) {
    let answerAction = {
        print("VPush: Answer", callID)
        self.isActiveCall = true
        self.client.answer(callID, callback: completion)
    }

    if ongoingPushLogin {
        print("VPush: Storing answer")
        storedAction = answerAction
    } else {
        answerAction()
    }

}

func reject(_ callID: String, completion: @escaping (Error?) -> Void) {
    let rejectAction = {
        print("VPush: Reject", callID)
        self.isActiveCall = false
        self.client.reject(callID, callback: completion)
    }

    if ongoingPushLogin {
        print("VPush: Storing Reject")
        storedAction = rejectAction
    } else {
        rejectAction()
    }
}Again, you can only answer or reject a call after the Client SDK has been logged in. Both functions use the ongoingPushLogin to check if the login has been successfully completed; if not, the action is stored using storedAction. If you look at the handlePushLogin function, you can see that when the login is complete, it calls a stored action if there is one.
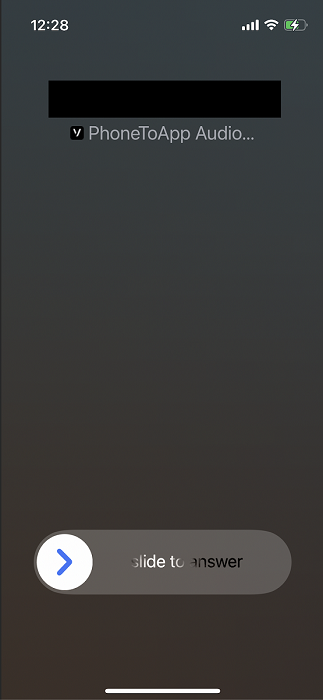
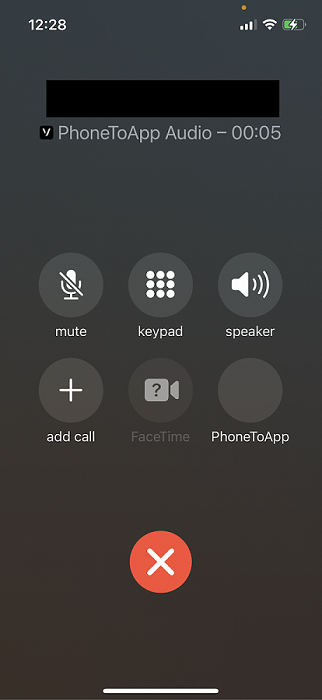
Build and Run (CMD + R) the project onto your iOS device (or simulator in Xcode 14 and above), accept the microphone permissions and lock the device. Then call the number linked to your Vonage Application from earlier. You will see the incoming call directly on your lock screen; then once you pick it up it will go into the familiar iOS call screen:
If you check the call logs on the device, you will also see the call listed there.
You can find the completed project on GitHub. You can do a lot more with the Client SDK and CallKit; you can use CallKit for outbound calls. Learn more about the Client SDK on the Vonage Client SDK Overview and CallKit on developer.apple.com.