
Share:
Yonatan has been involved in some awesome projects in the academy and the industry - from C/C++ through Matlab to PHP and javascript. Former CTO at Webiks and Software Architect at WalkMe. Currently he is a software architect at Vonage and an egghead instructor.
How to Implement Your Own SSR Server for Web Components
Time to read: 11 minutes
Server Side Rendering (SSR) is a scorching topic today. What’s with React Server Components bringing all these buzz words that “I just have to implement in my project”...In this article, we will build our own server to learn the mechanics behind the SSR paradigm and its possible extensions. Understanding how SSR works will help you extend current SSR solutions to fit your needs. For instance, you might find yourself in need of SSR web components in a Nuxt server.
At Vonage, we have a public project called Developer Portal. It’s a documentation website that’s not behind a login page (a.k.a. public) and holds mostly content. We also want the content to be Search Engine Optimized (SEO), which makes it a good candidate for SSR.
The developer portal is written in Vue and is served using Nuxt. Nuxt allows for SSR via its Universal Rendering mechanism. We needed to enable Nuxt to also SSR our design system’s web components. Hence started our journey of building an SSR mechanism for Web Components.
In a nutshell, SSR is the process of running our app on a server and returning plain HTML to the client.
The vue code is rendered in our portal on a node.js (Nuxt) server. The output of the rendering is HTML (with possibly inlined CSS). This HTML (+CSS) is sent to the browser and shown there - without any JavaScript. Hence, the user gets to see the website really fast.
In addition, showing the website's layout as it should be with JavaScript avoids heavy layout shifts resulting from components suddenly getting content and expanding once JavaScript kicks in.
Note that bots (such as search engine crawlers) usually don’t see JavaScript, so getting this bunch of contentful HTML right away could do wonders for your search engine ranking.
While forms, links, videos, etc., should work in non-complex examples, we have no advanced interactivity without JavaScript. So, the user gets to see the website but cannot interact with non-native functionality.
Documentation is a classic example of where SSR is truly needed. It mostly shows text and images to the user, and the interactivity is mainly scrolling to see more of the text and images. This “thin” view layer of text and images can be termed the dehydrated version of our application.
What if we need to interact with the page? We will need to hydrate our components. Hydration is a marketable name for “load our JavaScript”. Once JavaScript loads, we get our functionality.
In essence, SSR helps us load our static content faster so users can consume it but not interact with it. It also contributes to our SEO ranking.
The first thing I recommend to most people is: Don’t build your own SSR server.
Having said that, in this article, we will build our own server to learn the mechanics behind the SSR paradigm and its possible extensions. Understanding how SSR works will help you extend current SSR solutions to fit your needs. For instance, you might find yourself in need of SSR web components in a Nuxt server.
Now that we understand the usefulness of building an SSR server (or lack thereof ;) ), let’s build one for learning purposes.
An SSR server is essentially an HTTP server that receives a request from the client and, through this request, parses a template and returns HTML to the client.
Here’s an illustration of the process:
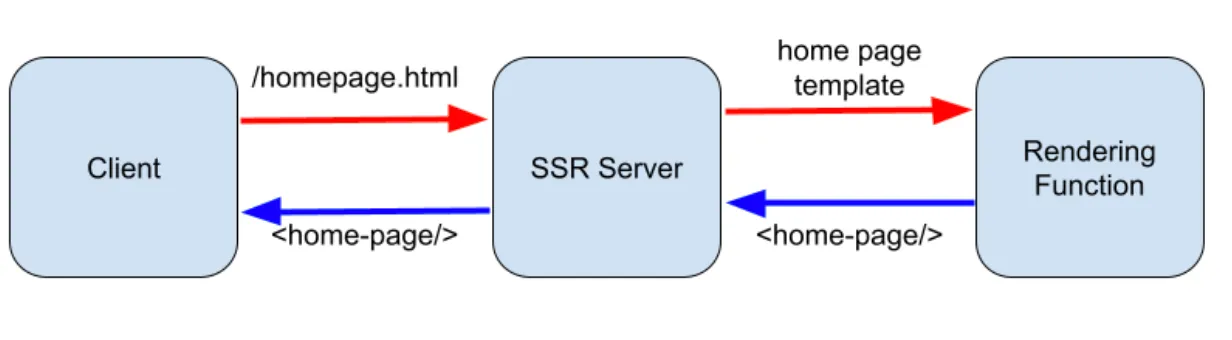 SSR architecture
From this, we can define the building blocks of our server:
An HTTP server that handles routes
A rendering function
The HTTP server is pretty standard. It serves static files and parses routes sent to it (like homepage):
import http from 'http';
import fs from 'fs';
import path from 'path';

import * as routes from './routes/index.mjs';
const CONTENT_TYPES = {
    '.js': 'text/javascript',
    '.mjs': 'text/javascript',
    '.css': 'text/css',
    '.png': 'image/png',
    '.jpg': 'image/png',
    '.gif': 'image/png',
    '.ico': 'image/png',
};

const server = http.createServer(async (req, res) => {
    function returnFileContent(filePath, contentType) {
        fs.readFile(filePath, (err, content) => {
            if (err) {
                if (err.code === 'ENOENT') {
                    res.writeHead(404);
                    res.end('File not found');
                } else {
                    res.writeHead(500);
                    res.end(`Server Error: ${err.code}`);
                }
            } else {
                res.writeHead(200, { 'Content-Type': contentType });
                res.end(content, 'utf-8');
            }
          });
    }

    let filePath = '.' + req.url;
    if (filePath === './') {
        filePath = 'HomePage';
    }

    const extname = path.extname(filePath);
    let contentType = CONTENT_TYPES[extname] ?? 'text/html';

    if (contentType === 'text/html') {
      res.writeHead(200, { 'Content-Type': contentType });
      res.end(await routes[filePath].template, 'utf-8');
    } else {
        returnFileContent(filePath, contentType);
    }
});

const PORT = 3000;
server.listen(PORT, () => {
    console.log(`Server running on http://localhost:${PORT}/`);
});
Our server imports a routes object. This routes object holds a hash table for routes. Each route has a template method that returns valid HTML. It’s used like this:
res.end(await routes[filePath].template, 'utf-8');
In our project, we’ll have a routes folder that will hold an index.mjs file.
Besides the index file, we will create a home-page folder where the homepage route will reside. It’ll look like this:
 Routes folder structurehome-page will hold its own index.mjs file:
 Homepage template index fileThis HomePage object will also be exported from the routes/index.mjs file:
export * from ‘./home-page/index.mjs’
Now we just need to implement getHomePageTemplate in home-page.template.mjs:
export function getHomePageTemplate() {
    return `
        <div>Hello World</div>
    `;
}Finally, we need to use the route in our server, so we will change the main index.mjs file:
import http from 'http';
import fs from 'fs';
import path from 'path';

import * as routes from './routes/index.mjs';
const CONTENT_TYPES = {
    '.js': 'text/javascript',
    '.css': 'text/css',
    '.png': 'image/png',
    '.jpg': 'image/png',
    '.gif': 'image/png',
};

function returnFileContent(filePath, contentType) {
    fs.readFile(filePath, (err, content) => {
        if (err) {
            if (err.code === 'ENOENT') {
                res.writeHead(404);
                res.end('File not found');
            } else {
                res.writeHead(500);
                res.end(`Server Error: ${err.code}`);
            }
        } else {
            res.writeHead(200, { 'Content-Type': contentType });
            res.end(content, 'utf-8');
        }
      });
}
const server = http.createServer((req, res) => {
    let filePath = '.' + req.url;
    if (filePath === './') {
        filePath = 'HomePage';
    }

    const extname = path.extname(filePath);
    let contentType = CONTENT_TYPES[extname] ?? 'text/html';

    if (contentType === 'text/html') {
      res.writeHead(200, { 'Content-Type': contentType });
      res.end(routes[filePath].template(), 'utf-8');
    } else {
        returnFileContent(filePath, contentType);
    }
});

const PORT = 3000;
server.listen(PORT, () => {
    console.log(`Server running on http://localhost:${PORT}/`);
});Here, we import the routes (line 5) and use them when we return text/html (line 41).
The results are astounding!
 The results of the served content in the browser
This template is quite boring… let’s return something spicy. For this, I’ll use the Vivid design system. Vivid components are pure web components. We will use them to spice up our template and render them server-side.
In Vivid’s button component page, we can take the appearance example, which exhibits four different buttons:
 The button code sample from the Vivid documentation
We can replace our template in home-page.template.mjs: with the example code:
export function getHomePageTemplate() {
    return `
        <vwc-button label="ghost" appearance="ghost"></vwc-button>
        <vwc-button label="ghost-light" appearance="ghost-light"></vwc-button>
        <vwc-button label="filled" appearance="filled"></vwc-button>
        <vwc-button label="outlined" appearance="outlined"></vwc-button>
    `;
}And the result here is:
 The results of the served content in the browser after adding the Vivid buttons to the template
A blank page beside a not-so-empty body. Where are the components from the code example?
They do not load because they require us to load JS and CSS.
This is usually a trivial question, but how is it done in an SSR server?
Let’s go for the simplest way to do this, which is to use a CDN. You can import Vivid components by using this convention:
https://unpkg.com/@vonage/vivid@latest/{pathToFile}
Using this, we can import our code into the template:
export function getHomePageTemplate() {
    return `
        <style>
            @import "https://unpkg.com/@vonage/vivid@latest/styles/tokens/theme-light.css";
            @import "https://unpkg.com/@vonage/vivid@latest/styles/core/all.css";
            @import "https://unpkg.com/@vonage/vivid@latest/styles/fonts/spezia-variable.css";
        </style>
        <vwc-button label="ghost" appearance="ghost"></vwc-button>
        <vwc-button label="ghost-light" appearance="ghost-light"></vwc-button>
        <vwc-button label="filled" appearance="filled"></vwc-button>
        <vwc-button label="outlined" appearance="outlined"></vwc-button>
        <script type="module" src="https://unpkg.com/@vonage/vivid@latest/button"></script>
    `;
}If we go test our client, we will see our components. Well… kinda:
 The results of the served content in the browser after importing the Vivid library client-side
One thing we need to do to make Vivid components work is to add the vvd-root class to the element that wraps them (usually the body…).
Let’s define a wrapper to our template:
export function getHomePageTemplate() {
    return `
        <style>
            @import "https://unpkg.com/@vonage/vivid@latest/styles/tokens/theme-light.css";
            @import "https://unpkg.com/@vonage/vivid@latest/styles/core/all.css";
            @import "https://unpkg.com/@vonage/vivid@latest/styles/fonts/spezia-variable.css";

            #buttons-wrapper {
                min-width: 50px;
                min-height: 50px;
                background-color: crimson;
            }
        </style>
        <div id="buttons-wrapper" class="vvd-root">
            <vwc-button label="ghost" appearance="ghost"></vwc-button>
            <vwc-button label="ghost-light" appearance="ghost-light"></vwc-button>
            <vwc-button label="filled" appearance="filled"></vwc-button>
            <vwc-button label="outlined" appearance="outlined"></vwc-button>
        </div>
        <script type="module" src="https://unpkg.com/@vonage/vivid@latest/button"></script>
    `;
}Here’s the outcome:
 An animated Gif showing the page load of the code above
So the buttons work, but…Can you see the issue?
The HTML loads - as we can see from the wrapping div - and then the buttons render once the JS kicks in, creating a major layout shift. Imagine this happening in a bigger app with a lot more components.
That’s not good…
How can we prevent this flash? Let’s render the components on the server!
Instead of loading the JS on the client side, we can render the components on the server and send a complete HTML. So, we need to find a way to render our components on the server as if they were in a browser.
Every framework has a different rendering method.
Web components are rendered natively by the browser. Web components also bring the idea of shadow DOM. In essence, the shadow DOM is a document fragment in which you can add HTML and CSS. For this, the browser creates a shadow root inside our component:
 Shadow Root under the button
Everything outside the shadow-root is "in the light" while the rest is in the shadow. The advantage of a shadowDOM is that it encapsulates the styles. Styles inside do not affect anything outside and (almost completely) vice-versa.
That means if we take our template and set it as the innerHTML of a div, we should get rendered components. Let’s try that in the browser:
const div = document.createElement('div');
div.innerHTML = `
<style>
            @import "https://unpkg.com/@vonage/vivid@latest/styles/tokens/theme-light.css";
            @import "https://unpkg.com/@vonage/vivid@latest/styles/core/all.css";
            @import "https://unpkg.com/@vonage/vivid@latest/styles/fonts/spezia-variable.css";

            #buttons-wrapper {
                min-width: 50px;
                min-height: 50px;
                background-color: crimson;
            }
        </style>
        <div id="buttons-wrapper" class="vvd-root">
            <vwc-button label="ghost" appearance="ghost"></vwc-button>
            <vwc-button label="ghost-light" appearance="ghost-light"></vwc-button>
            <vwc-button label="filled" appearance="filled"></vwc-button>
            <vwc-button label="outlined" appearance="outlined"></vwc-button>
        </div>
        <script type="module" src="https://unpkg.com/@vonage/vivid@latest/button"></script>
`;
document.body.appendChild(div);If you paste this code into your browser, you should see the crimson div without the button because the JS would not be imported.
Nevertheless - if you’d have imported the JS beforehand, it would have worked:
const script = document.createElement('script');
script.type = 'module';
script.src = 'https://unpkg.com/@vonage/vivid@latest/button';
const div = document.createElement('div');
div.innerHTML = `
<style>
            @import "https://unpkg.com/@vonage/vivid@latest/styles/tokens/theme-light.css";
            @import "https://unpkg.com/@vonage/vivid@latest/styles/core/all.css";
            @import "https://unpkg.com/@vonage/vivid@latest/styles/fonts/spezia-variable.css";

            #buttons-wrapper {
                min-width: 50px;
                min-height: 50px;
                background-color: crimson;
            }
        </style>
        <div id="buttons-wrapper" class="vvd-root">
            <vwc-button label="ghost" appearance="ghost"></vwc-button>
            <vwc-button label="ghost-light" appearance="ghost-light"></vwc-button>
            <vwc-button label="filled" appearance="filled"></vwc-button>
            <vwc-button label="outlined" appearance="outlined"></vwc-button>
        </div>
`;
document.body.appendChild(div);
document.body.appendChild(script);As tested on Google.com:
 The google home page with the button HTML snippet added to it
The thing is, document, body, and HTML elements do not exist natively on the server side. So…
Great question! Glad you asked.
There are several ways to render HTML on the server side.
Because Vivid tests its components using jsdom, we know it can render our components without a browser.
Hence, if we create a JSDOM environment in our server, we can use our code to render our components.
That’s easy enough because of the almighty NPM!
npm i global-jsdom/register jsdom will add jsdom - a library that mocks the browser’s DOM API in the server runtime, allowing it to create markup as if it were in the browser. global-jsdom/register exposes browser API globally so we can use it in our code. Hence, we can render our components serverside.
Let’s change our template’s code a bit to use that:
import 'global-jsdom/register';
import '@vonage/vivid/button';

export function getHomePageTemplate() {
    const template = `
        <style>
            @import "https://unpkg.com/@vonage/vivid@latest/styles/tokens/theme-light.css";
            @import "https://unpkg.com/@vonage/vivid@latest/styles/core/all.css";
            @import "https://unpkg.com/@vonage/vivid@latest/styles/fonts/spezia-variable.css";

            #buttons-wrapper {
                min-width: 50px;
                min-height: 50px;
                background-color: crimson;
            }
        </style>
        <div id="buttons-wrapper" class="vvd-root">
            <vwc-button label="ghost" appearance="ghost"></vwc-button>
            <vwc-button label="ghost-light" appearance="ghost-light"></vwc-button>
            <vwc-button label="filled" appearance="filled"></vwc-button>
            <vwc-button label="outlined" appearance="outlined"></vwc-button>
        </div>
    `;

    const div = document.createElement('div');
    div.innerHTML = template;
    document.body.appendChild(div);
    return div.innerHTML;
}We import global-jsdom/register. Note that we import the @vonage/vivid/button package server-side, so the web component will be rendered as one.
We let jsdom render our template just by adding it to the DOM and returning its innerHTML. It looks like this:
 The results of the served content in the browser after serving the HTML from the server.
OH NO! No buttons in the view! They are indeed in the DOM. We can also see the input in the light DOM inside every button (it’s there to solve form association).
The reason we do not see anything is that innerHTML does not get us the content of the shadowDOM.
So what we could try doing is getting the shadowDOM of every component like this:
function appendOwnShadow(element) {

    const shadowTemplate = ${element.shadowRoot.innerHTML};

    const tmpElement = document.createElement('div');

    tmpElement.innerHTML = shadowTemplate;

    element.appendChild(tmpElement.children[0]);

}

Array.from(div.querySelectorAll(‘vwc-button’))

.forEach(button => button.appendChild(appendOwnShadow(button)));Which gives us this UI:
 The four buttons deformedYay! We can see something, but…It’s not exactly the same, right?
Looking at the HTML, we can see the shadowroot is missing on this gist link.
This definitely might affect the component’s styling since we are losing the encapsulation.
For this purpose, the HTML spec now defines a shadowrootmode attribute for the template tag. When the browser encounters <template shadowrootmode=”open”>, it knows to take everything inside that template and render it inside a shadow DOM.
Using this knowledge, we can change our code as follows:
function appendOwnShadow(element) {

    const shadowTemplate = <template shadowrootmode="open">   ${element.shadowRoot.innerHTML}</template>;

    const tmpElement = document.createElement('div');

    tmpElement.innerHTML = shadowTemplate;

    element.appendChild(tmpElement.children[0]);

}

Array.from(div.querySelectorAll(‘vwc-button’))

.forEach(button => button.appendChild(appendOwnShadow(button)));It now renders like this:
 The four buttons appear correctly
Which is how we expected it to render! Hooray!
If you look at the DOM now, it looks like this:
 The buttons' HTML snippet from the Elements PanelHow cool is that? We rendered our web components server-side and prevented the layout shift in our app!
Let’s try to spice up our application.
The button we used was quite basic. Let’s try to use a button with an icon inside:
<vwc-button icon="facebook-color" label="ghost" appearance="ghost"></vwc-button>
<vwc-button icon="linkedin-color" label="ghost-light" appearance="ghost-light"></vwc-button>
<vwc-button icon="twitter-color" label="filled" appearance="filled"></vwc-button>
<vwc-button icon="instagram-color" label="outlined" appearance="outlined"></vwc-button>And it looks like this in the browser:
![]() The buttons appear, but internal icon elements are not renderedSomething changed, but we can’t see any icons…
The buttons appear, but internal icon elements are not renderedSomething changed, but we can’t see any icons…
The HTML inside the button looks like this:
![]() A button's shadow-root innerHTMLWe can see vwc-icon right there in the middle. We can see two problems here:
A button's shadow-root innerHTMLWe can see vwc-icon right there in the middle. We can see two problems here:
The icon has no attributes - so it doesn’t really know how to render itself.
The icon has no content - mainly, no shadowroot.
Let’s solve the simpler issue. The icon gets its attributes from the button component. The template is rendered asynchronously. That means that after we add the div to the DOM, the actual update happens after another iteration of the event loop. So, we need to await the completion of the rendering process.
For this, we can set the template function to be async and await one event loop cycle:
import 'global-jsdom/register';
import '@vonage/vivid/button';

function appendOwnShadow(element) {
    const shadowTemplate = `<template shadowrootmode="open">${element.shadowRoot.innerHTML}</template>`;
    const tmpElement = document.createElement('div');
    tmpElement.innerHTML = shadowTemplate;
    element.appendChild(tmpElement.children[0]);
}

export async function getHomePageTemplate() {
    const template = `
        <style>
            @import "https://unpkg.com/@vonage/vivid@latest/styles/tokens/theme-light.css";
            @import "https://unpkg.com/@vonage/vivid@latest/styles/core/all.css";
            @import "https://unpkg.com/@vonage/vivid@latest/styles/fonts/spezia-variable.css";

            #buttons-wrapper {
                min-width: 50px;
                min-height: 50px;
                background-color: crimson;
            }
        </style>
        <div id="buttons-wrapper" class="vvd-root">
            <vwc-button icon="facebook-color" label="ghost" appearance="ghost"></vwc-button>
            <vwc-button icon="linkedin-color" label="ghost-light" appearance="ghost-light"></vwc-button>
            <vwc-button icon="twitter-color" label="filled" appearance="filled"></vwc-button>
            <vwc-button icon="instagram-color" label="outlined" appearance="outlined"></vwc-button>
        </div>
    `;

    const div = document.createElement('div');
    div.innerHTML = template;
    document.body.appendChild(div);
    await new Promise(res => setTimeout(res));
    Array.from(div.querySelectorAll('vwc-button')).forEach(appendOwnShadow);
    return div.innerHTML;
}Notice we’ve added the magic await new Promise(res => setTimeout(res)); in line 28.
Now, when we glimpse at our HTML, we see the icon gets the attributes:
![]() A snippet showing the vwc-icon inside the button after the change
A snippet showing the vwc-icon inside the button after the change
The second issue - because of which we do not see the icons - arises from the fact we do not get the shadowroot’s HTML of the internal components.
One way to fix this would be to find all the web components recursively and render them.
To find the components, we can traverse the DOM tree like this:
function getAllNestedShadowRootsParents(element) {
    const nestedShadowRoots = [];

    function traverseShadowRoot(node) {
        if (node.shadowRoot) {
            nestedShadowRoots.push(node);
            node.shadowRoot.querySelectorAll('*').forEach(child => {
                traverseShadowRoot(child);
            });
        } else {
            Array.from(node.querySelectorAll('*')).forEach(child => traverseShadowRoot(child));
        }
    }

    traverseShadowRoot(element);
    return Array.from(new Set(nestedShadowRoots));
}This function gets an element (supposedly our wrapping div) and finds all the web components with shadowDOM.
Now, all that’s left to do is parse each one of them in our template file:
Let’s do this:
import 'global-jsdom/register';
import '@vonage/vivid/button';

function getAllNestedShadowRootsParents(element) {
    const nestedShadowRoots = [];

    function traverseShadowRoot(node) {
        if (node.shadowRoot) {
            nestedShadowRoots.push(node);
            node.shadowRoot.querySelectorAll('*').forEach(child => {
                traverseShadowRoot(child);
            });
        } else {
            Array.from(node.querySelectorAll('*')).forEach(child => traverseShadowRoot(child));
        }
    }

    traverseShadowRoot(element);
    return Array.from(new Set(nestedShadowRoots));
}

function appendOwnShadow(element) {
    const shadowTemplate = `<template shadowrootmode="open">${element.shadowRoot.innerHTML}</template>`;
    const tmpElement = document.createElement('div');
    tmpElement.innerHTML = shadowTemplate;
    element.appendChild(tmpElement.children[0]);
}

export async function getHomePageTemplate() {
    const template = `
        <style>
            @import "https://unpkg.com/@vonage/vivid@latest/styles/tokens/theme-light.css";
            @import "https://unpkg.com/@vonage/vivid@latest/styles/core/all.css";
            @import "https://unpkg.com/@vonage/vivid@latest/styles/fonts/spezia-variable.css";

            #buttons-wrapper {
                min-width: 50px;
                min-height: 50px;
                background-color: crimson;
            }
        </style>
        <div id="buttons-wrapper" class="vvd-root">
        <vwc-button icon="facebook-color" label="ghost" appearance="ghost"></vwc-button>
        <vwc-button icon="linkedin-color" label="ghost-light" appearance="ghost-light"></vwc-button>
        <vwc-button icon="twitter-color" label="filled" appearance="filled"></vwc-button>
        <vwc-button icon="instagram-color" label="outlined" appearance="outlined"></vwc-button>
        </div>
    `;

    const div = document.createElement('div');
    div.innerHTML = template;
    document.body.appendChild(div);
    await new Promise(res => setTimeout(res));
    getAllNestedShadowRootsParents(div).reverse().forEach(appendOwnShadow);
    return div.innerHTML;
}Notice the change in line 54—we’re going over all the elements with shadow DOM in reverse order and appending a shadowroot template with their innerHTML.
The result is astounding:
![]() The four buttons with their icons rendered correctlyIf you have followed up so far, good job! You got the basics of SSR.
The four buttons with their icons rendered correctlyIf you have followed up so far, good job! You got the basics of SSR.
Our simple SSR server can be optimized further. For instance, some things, such as the CSS and the icons’ SVGs, are still dependent on servers that are far away. We can add more logic to our SSR server to fetch and inline them in the returned HTML.
More ideas can be taken from other SSR systems. For instance, react server components have a dedicated API to fetch and send requests to the server, which in turn requests the data and renders the needed view.
Qwik sets up service workers to fetch the JS in the background.
All of the SSR frameworks have many optimizations done for you, but they do not always fit your needs, so knowing how they work is a good start to extending them.
That was quite a ride, wasn’t it?
Building an SSR mechanism is quite simple, in essence, but it can always be improved, tweaked, and optimized. You might possibly find yourself maintaining a big codebase just to handle SSR.
You can choose to use nextjs (react), Nuxtjs (vue), or some other SSR library. If you are using web components, SSR libraries like litssr or fastssr can take the heavy lifting from you.
One big caveat with these SSR frameworks or libraries is that they work only for the framework or library they were meant to work with.
Our use case was to build an SSR mechanism to work alongside Nuxt. So you can call my code an SSR plugin. I hope this article gave you a hint on how to get started building a plugin like that if the need ever arises.
The commonality to all SSRs is that there is some rendering function. This function is used on your template and returns an HTML string that is sent to the client (well, except React Server Components that actually send a JSON - but that’s beyond the scope of this article).
Some HTML is hydrated later after the JavaScript loads asynchronously without blocking the page. In this article, we learned how to do it with web components and shadow DOM.
We do not block the page with JS load, which helps us serve content faster, avoid heavy layout shifts, and possibly enhance our SEO ranking.
Please join us on our Vonage Community Slack or send us a message on X, previously known as Twitter, and let us know how we can help!
Share:
Yonatan has been involved in some awesome projects in the academy and the industry - from C/C++ through Matlab to PHP and javascript. Former CTO at Webiks and Software Architect at WalkMe. Currently he is a software architect at Vonage and an egghead instructor.