Share:
Abdul is a Developer Advocate for Vonage. He has a background working in consumer products as an iOS Engineer. In his spare time, he enjoys biking, listening to music and mentoring those who are just beginning their journey in tech
How to Make Outbound Calls Using iOS CallKit
Time to read: 5 minutes
In this tutorial, you will create a SwiftUI application that can make phone calls using the Vonage Client SDK and CallKit. CallKit allows you to integrate your iOS application into the system. When making outbound calls, the call history from your application will be available in the iOS Phone app.
A Vonage API account. If you don't have one already, you can sign up today.
An Apple Developer account and an iOS device
Xcode 12 and Swift 5 or greater.
Cocoapods to install the Vonage Client SDK for iOS.
First, you will deploy a server to handle creating a Vonage Application, Users, JWT Generation and webhooks. Then you will adapt an iOS application that, using the Vonage Client SDK, will make calls using CallKit.
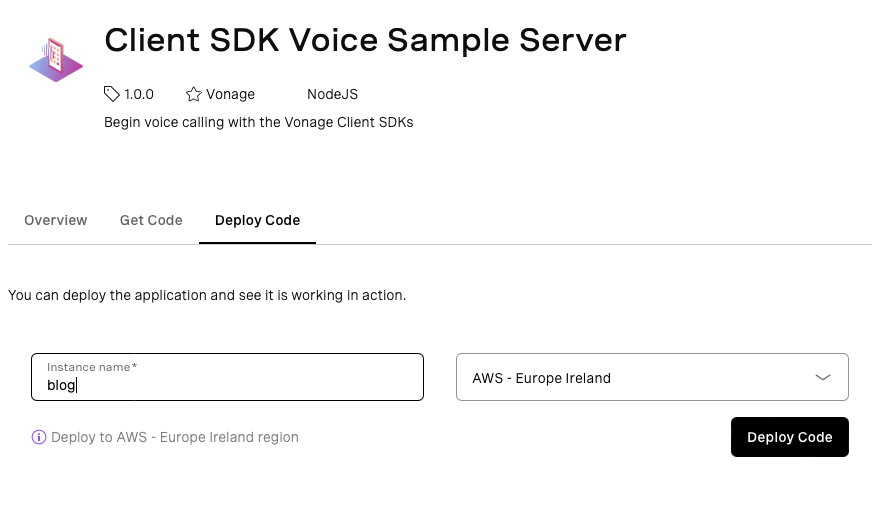
This project will be using the Vonage Cloud Runtime Marketplace to deploy a Client SDK Voice server on Vonage infrastructure. Open the Client SDK Voice Sample Server product page. Open the "Deploy Code" tab, and if you have not logged in yet do so now.
Enter a name for the deployment and choose a region. Then click on the "Deploy Code" button.
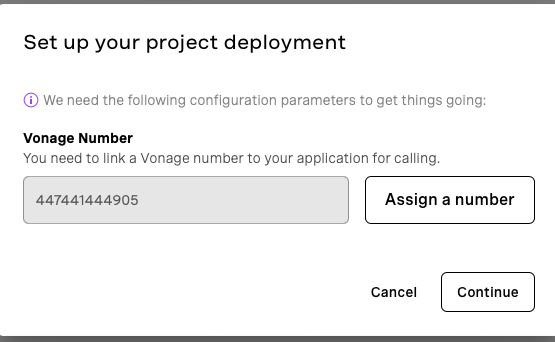
To use the Voice API, you need to buy and assign a Vonage number to the application. Click on "Assign a number" to view your existing numbers or to buy a new one. Once done, click on "Continue".
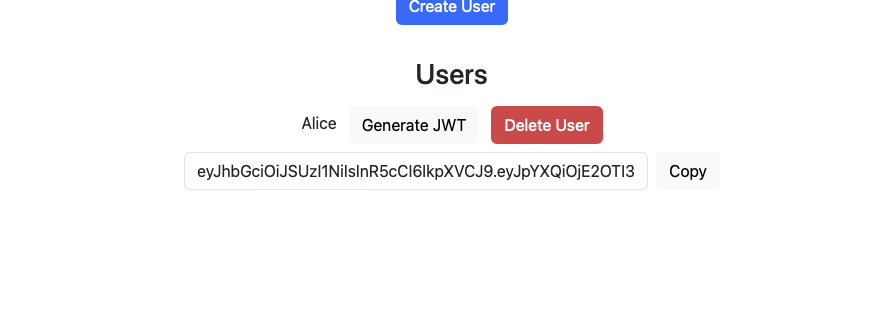
Once the deployment has finished, click on the "Launch" button. This will open up the server application in your browser, where you can read more about how the server works. To continue with the tutorial, you will need to create a user. Users are how you identify an application running the Vonage Client SDK with the Vonage APIs.
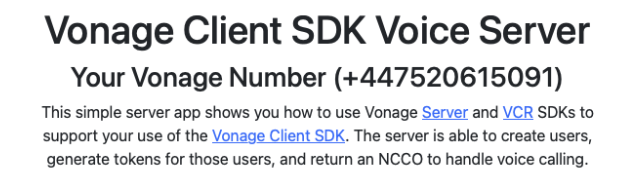
Create a user called "Alice" and generate a JWT. The Client SDKs use JWT to authenticate with Vonage. When you make a call to the Vonage number you assigned to the application earlier, Vonage will make a request to this server which will return a Call Control Object which will connect the incoming call with the "Alice" user.
This tutorial will be built on top of an existing project. If you are not familiar with making outbound calls using the Vonage Client SDK, It is recommended you go through the How to Make Phone Calls With SwiftUI blog post. When ready, you can clone the starter project from GitHub by using this command in your terminal:
git clone git@github.com:Vonage-Community/blog-clientsdk-ios_swift-swiftui_app_to_phone.gitThen change directory into the project's folder and install the VonageClientSDKVoice dependency:
cd blog-clientsdk-ios_swift-swiftui_app_to_phone
pod installOnce complete, you can open the project with this command:
xed .
Since you are going to CallKit to make calls, you can update the loginIfNeeded function in the ContentView.swift file to remove the isUsingCallKit flag. The SDK defaults this value to true. Here you can also paste the JWT for the user "Alice" you created earlier:
func loginIfNeeded() {
    guard status != "Connected" else { return }
    client.createSession("ey...") { error, sessionId in
        if let error {
            self.updateStatus(error.localizedDescription)
        } else {
            self.updateStatus("Connected")
        }
    }
}
CallKit requires you to add the VoIP background mode. Make sure you are logged into your Apple developer account in Xcode via preferences. If so, select your target and then choose Signing & Capabilities:
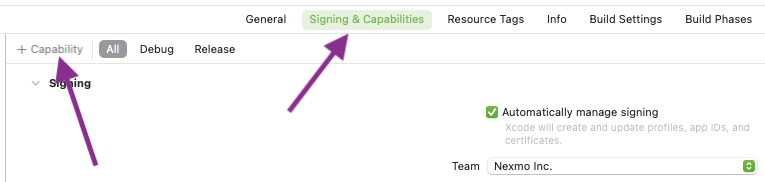
Then select the add capability button and the Background Modes capability. Under the Background Modes capability, select Voice over IP:

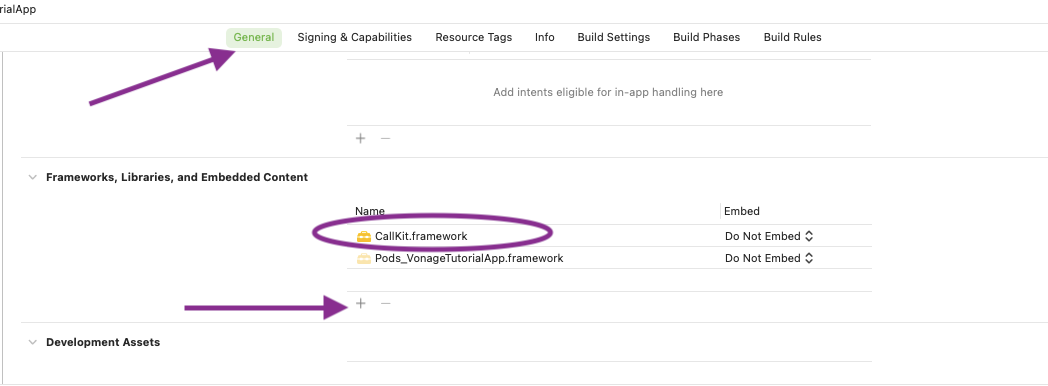
Link the CallKit framework to your project by adding it under Frameworks, Libraries, and Embedded Content under General:
Now, you will create a class, ProviderManager. CallKit handles communicating between your app and the system via the CXProvider. Create a new Swift file (CMD + N) called ProviderManager:
import CallKit
import Foundation
import VonageClientSDKVoice

protocol ProviderManagerDelegate: AnyObject {
    func callReported(_ providerManager: ProviderManager, callUUID: UUID)
    func providerReset()
}

final class ProviderManager: NSObject {
    private static var providerConfiguration: CXProviderConfiguration = {
        let providerConfiguration = CXProviderConfiguration()
        providerConfiguration.maximumCallsPerCallGroup = 1
        providerConfiguration.supportedHandleTypes = [.generic, .phoneNumber]
        return providerConfiguration
    }()

    private let provider = CXProvider(configuration: ProviderManager.providerConfiguration)
    weak var delegate: ProviderManagerDelegate?

    override init() {
        super.init()
        provider.setDelegate(self, queue: nil)
    }

    public func reportOutgoingCall(callUUID: UUID) {
        provider.reportOutgoingCall(with: callUUID, connectedAt: .now)
    }

    public func reportFailedCall(callUUID: UUID) {
        provider.reportCall(with: callUUID, endedAt: .now, reason: .failed)
    }

    public func reportEndedCall(callUUID: UUID) {
        provider.reportCall(with: callUUID, endedAt: .now, reason: .remoteEnded)
    }
}The code above includes creating a CXProvider and some helper functions to report the status of calls to the system. The ProviderManagerDelegate is also defined here.
CXProviderDelegate
The CXProviderDelegate gives you updates from the system regarding calls. Add an extension to the ProviderManager that implements the delegate in the same file:
extension ProviderManager: CXProviderDelegate {
    func provider(_ provider: CXProvider, perform action: CXStartCallAction) {
        provider.reportOutgoingCall(with: action.callUUID, startedConnectingAt: .now)
        delegate?.callReported(self, callUUID: action.callUUID)
        action.fulfill()
    }

    func providerDidReset(_ provider: CXProvider) {
        delegate?.providerReset()
    }

    func provider(_ provider: CXProvider, didActivate audioSession: AVAudioSession) {
        VGVoiceClient.enableAudio(audioSession)
    }

    func provider(_ provider: CXProvider, didDeactivate audioSession: AVAudioSession) {
        VGVoiceClient.disableAudio(audioSession)
    }
}When a user enters and number and starts a call, the app will request for CallKit to start the call. If that request is successful, the CXStartCallAction delegate function will be called which reports the outgoing call. It is very important to note that VGVoiceClient.enableAudio/VGVoiceClient.disableAudio is being called here with the audio session provided by the CallKit CXProviderDelegate.
CallModel
Now that the ProviderManager is set up, you can now update the CallModel class to use it. Open the ContentView.swift file and replace the variables at the top of the CallModel class:
final class CallModel: NSObject, ObservableObject, VGVoiceClientDelegate {

    @Published var status: String = ""
    @Published var isCalling: Bool = false
    private let client = VGVoiceClient()
    var number: String = ""


    private var callId: (vonage: String?, callkit: UUID?)
    private let callController = CXCallController()
    private let providerManager = ProviderManager()
    private let audioSession = AVAudioSession.sharedInstance()

    ...
}callId has now changed to a tuple to manage the mapping from a Vonage Call ID to a CallKit Call UUID, providerManager has been added as well as callController. callController is an instance of CXCallController, which will be used to request the system to start a call.
startCall Function
The startCall function now has to be updated to request a call via the callController when the user clicks the start call function. Replace the existing function with the new one:
func startCall() {
    isCalling = true
    let handle = CXHandle(type: .phoneNumber, value: number)
    self.callId.callkit = UUID()

    let startCallAction = CXStartCallAction(call: self.callId.callkit!, handle: handle)
    let transaction = CXTransaction(action: startCallAction)
    callController.request(transaction) { _ in }
}This new function creates a UUID since CallKit needs a way to identify the call, but you will not get the Vonage call ID until the SDK places a call. Then, a CXStartCallAction is used in a CXTransaction to request a call. This will call the CXStartCallAction function on the CXProviderDelegate you defined earlier.
endCall Function
Similarly, the endCall function needs to be updated for use with CallKit. Replace the existing function with the new one:
func endCall() {
    client.hangup(callId.vonage!) { error in
        if error == nil {
            if let callkitUUID = self.callId.callkit {
                let transaction = CXTransaction(action: CXEndCallAction(call: callkitUUID))
                self.callController.request(transaction) { _ in }
            }
        }
    }
}This new function created a CXEndCallAction action, which is used in a CXTransaction to request for the call to be ended. By requesting the call to end, the system is able to calculate the call duration accurately. You also need to handle the case where the call is ended remotely. Update the didReceiveHangupForCall function on the VGVoiceClientDelegate delegate:
func voiceClient(_ client: VGVoiceClient, didReceiveHangupForCall callId: VGCallId, withQuality callQuality: VGRTCQuality, reason: VGHangupReason) {
    if let callkitUUID = self.callId.callkit {
        providerManager.reportEndedCall(callUUID: callkitUUID)
    }
    resetState()
}Again, this ensured that the call ending is reported, via the providerManager, to the system so call duration can be calculated accurately.
ProviderManagerDelegate
Finally, implement the ProviderManagerDelegate so the providerManager is able to communicate changes back to the CallModel:
extension CallModel: ProviderManagerDelegate {
    func callReported(_ providerManager: ProviderManager, callUUID: UUID) {
        client.serverCall(["to": number]) { error, callId in
            if error == nil {
                providerManager.reportOutgoingCall(callUUID: callUUID)
                self.callId.vonage = callId
            } else {
                providerManager.reportFailedCall(callUUID: callUUID)
            }
        }
    }

    func providerReset() {
        resetState()
    }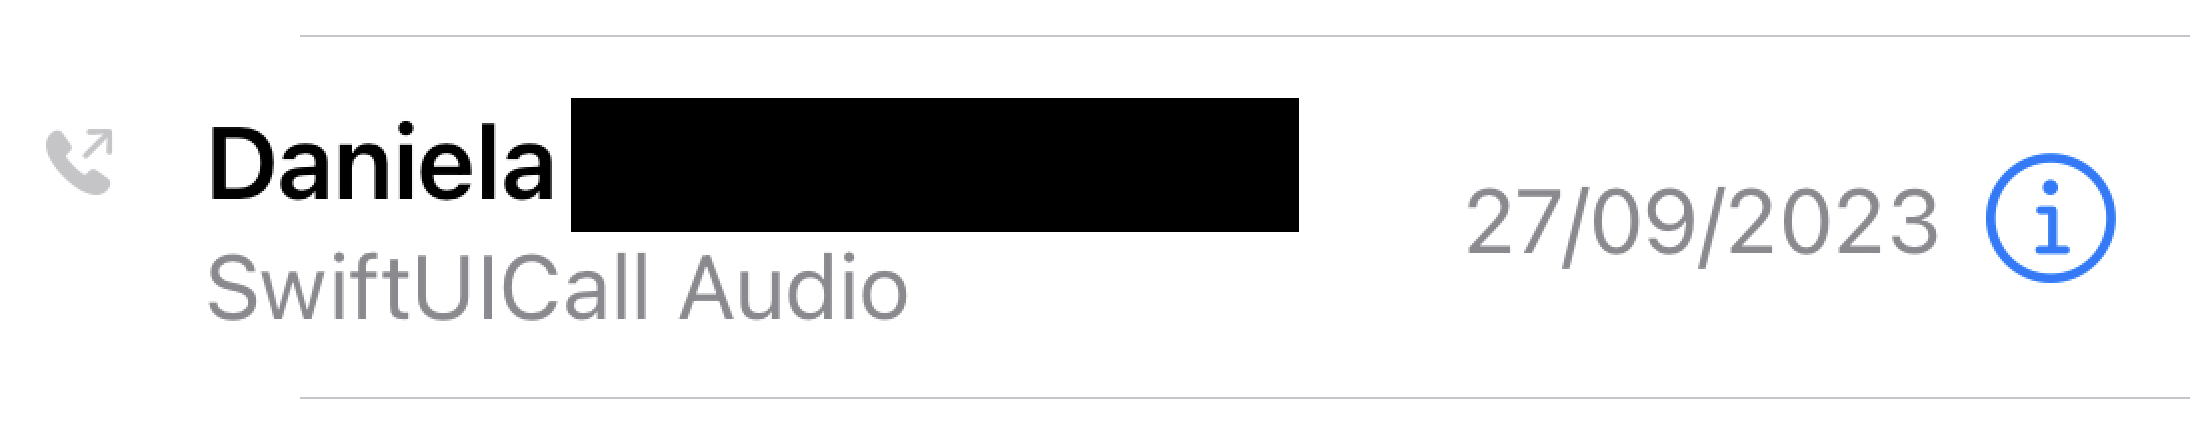
}When the providerManager has reported the call to the system successfully, this delegate function creates a call using the Vonage Client SDK. Again in both the success and error cases, the providerManager is being used to report the call status to the system. Now you can make a call in the app by running the Xcode project on a physical device. If you look at the recent calls in the phone app on iOS, you should see your call and the app name. If you click on the info icon, you will be able to see the call duration too.
You can find the completed project on GitHub. You can do a lot more with the Client SDK and CallKit; you can use CallKit for outbound calls. Learn more about the Client SDK on the Vonage Client SDK Overview and CallKit on developer.apple.com.