Many workers around the world are back in the office, but there’s no drop-off in the use of video conferencing systems! Most systems on the market today are designed for one speaker per video stream, making a mess out of the office room systems shared by multiple speakers. Imagine reading a transcript of an exchange between three people but with no identification of the different speakers. It can get pretty confusing.
Increasingly, conferencing systems are turning to artificial intelligence capabilities to manage this complexity. The latest generation of technologies goes beyond simple captions and translations and employs the power of AI to manage the complexity of room systems as well as hybrid video scenarios.
Knowing who said what to whom is important to make any sense of a conversation and in providing value from meeting notes and transcripts. Speaker identification goes beyond conversation comprehension, it allows for added value like meeting notes and transcripts. Separating out who is talking from a single audio source is a task humans have specially adapted for, but is a complex challenge for machines. This process is called speaker diarization.
In this blog, we will demonstrate how we built a video conferencing system for multi-speaker room systems with diarization.
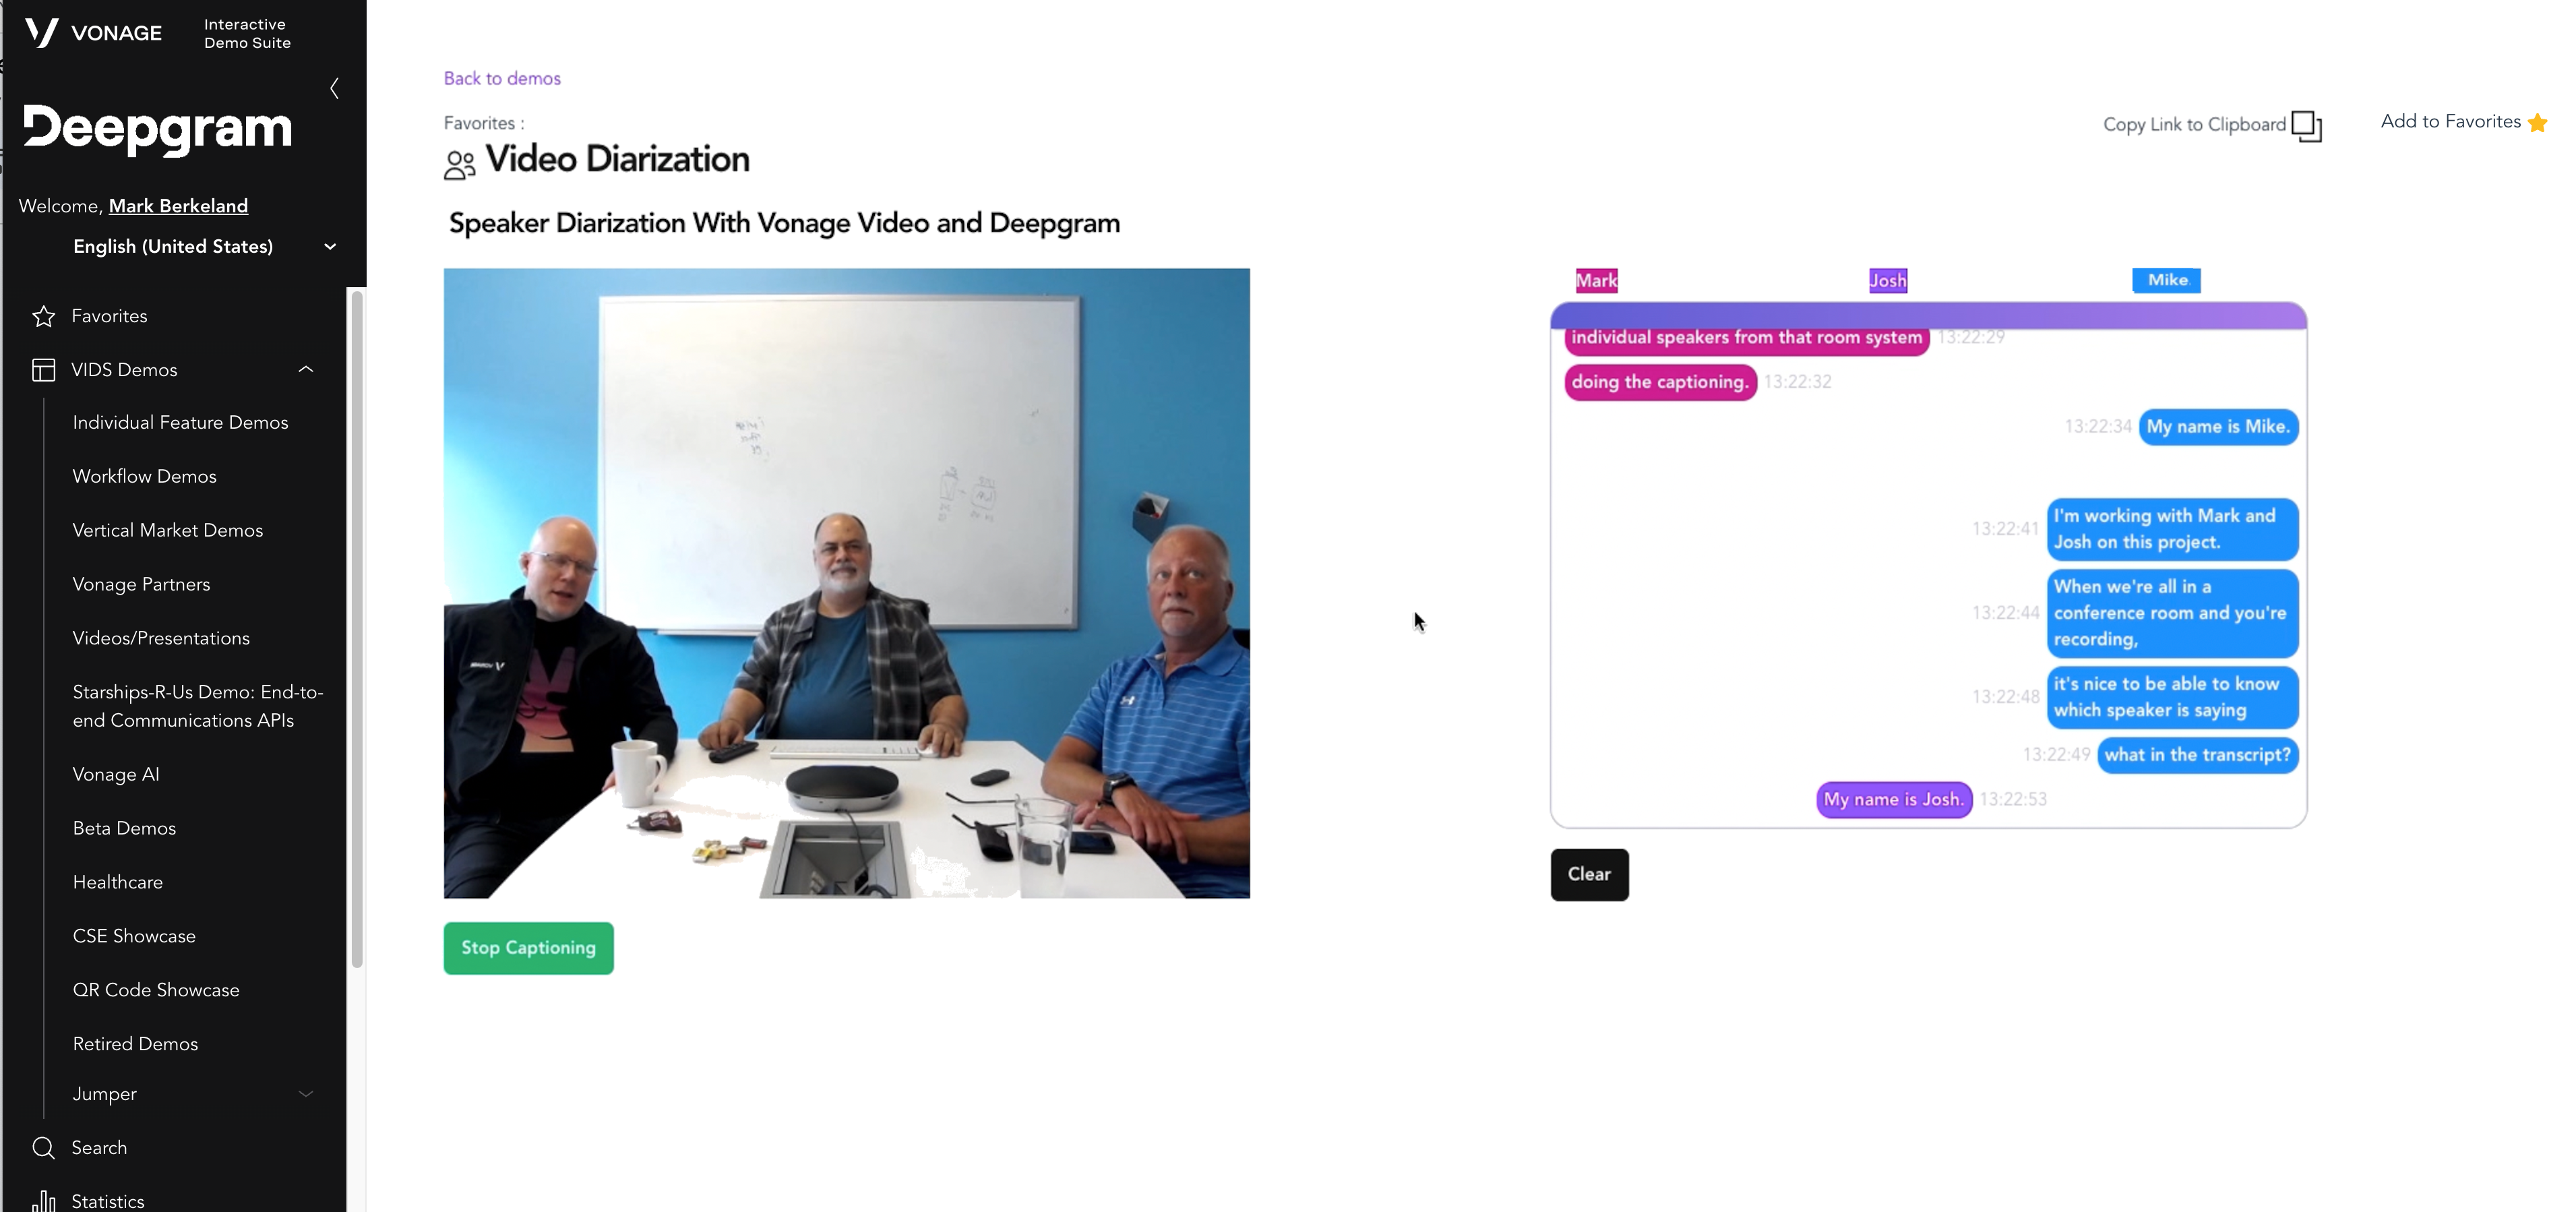
Below you can see a video of this demo in action!
To implement this solution, we needed to make sure:
The video conferencing system had secure access to raw audio on the server to ensure the fastest processing times, as well as capture from SIP devices for any dial-in participants.
The automatic speech recognition (ASR) service could separate individual speakers in an audio stream so that each speaker's utterances are identified uniquely.
Obtaining these capabilities was crucial to unlocking the full potential of conferencing systems for room systems and hybrid use cases and building a useful and friendly video application as seen below:
 vonage_video_api_diarization_demo.png
What is speaker diarization?
Speaker diarization is the process of separating an audio stream into segments according to speaker identity, regardless of channel. Speaker diarization is generally broken down into four major subtasks:
Detection - Find regions of audio that contain speech as opposed to silence or noise.
Segmentation - Divide and separate those detected regions into smaller audio sections.
Representation - Use a discriminative vector to represent those segments.
Attribution - Add a speaker label to each segment based on its discriminative representation.
There are varying capabilities to the diarization features that different ASR providers offer. Our partner Deepgram has implemented one of the most robust feature sets we’ve seen on the market, with over a dozen languages and no caps on the number of active speakers. You can learn more about this solution here.
Learn more about speaker diarization in this Deepgram (https://blog.deepgram.com/what-is-speaker-diarization/)
For speech recognition to work efficiently, one needs access to the raw audio streams directly from the media router. This provides the benefits of native support for all devices, uses a fraction of the bandwidth of a client-side solution, and can work with firewalled systems. Using Vonage Video API Audio Connector, we can extract raw audio streams from our live video sessions and send them to Deepgram for real-time (as well as offline) processing of audio streams. You can find more information about the Audio Connector here.
When we built our demo, we were interested in showing the real-time diarization of a room system using Vonage Video API to create the video session and Deepgram to transcribe the speech.
For clarity, we did not include other individuals joining the conference, though this solution absolutely can handle that case (as well as multiple simultaneous room systems). The Audio Connector gets started up when we add a new Publisher (who, in this case, we know is a Room System). It’s actually quite simple to set up the Audio Connector, as we already know the StreamID for the publisher (it is sent to us from the front-end app). Although the AudioConnector can handle “all”, or “a list of streams”, in our case we are just using the one stream, associated with the room system. Note that this COULD even be a traditional SIP room conferencing system.
We needed a Vonage Video API and a Deepgram account to build this demo. You may create your free accounts here for Vonage Video API and here for Deepgram.
After creating our Opentok instance (“opentok”), and creating a Session for the video conference (“sessionId”) along with an associated authorization token (“token”), the application informs us of the room system’s stream (“streamId”). It’s then just a matter of associating that stream with the URL of an awaiting websocket (“url”):
opentok.websocketConnect(sessionId, token, url, {
    streams: [streamId],
    headers: {
        sessionid: sessionId,
        streamId: streamId
    },
    audioRate: 16000,
}, function(error, socket) {
    if (error) {
        console.log('Error:', error.message);
    } else {
        console.log('OpenTok Socket websocket connected');
    }
});The websocket is listening for incoming connections, and since we are passing in the sessionId and streamId in the headers, we are able to know exactly which stream we will be transcribing and diarizing:
app.ws('/socket', async (ws, req) => {
  …
  ws.on('message', (msg) => {
    try {
      if (typeof msg === 'string') {
        let config = JSON.parse(msg);
        console.log("Socket string message: ", config);
        // Do whatever we need here…
        // the sessionId and streamId are contained in the msg!
} else {Where the “msg” arrives as:
Socket string message: {
    'content-type': 'audio/l16;rate=16000',
    event: 'websocket:connected',
    sessionid: '1_MX40NjQyMzI5Mn5-MTY4NjA5MDM1MTkwNX5yUVlkZmp0bE9jMk5rQTAyVxxxxxxxxx-xx',
    streamId: '553236ce-xxxx-xxxx-8cb4-9dd17b3119dc'
}We can now hook our incoming audio stream directly into Deepgram’s streaming model. When we see the Audio Connector websocket connecting, we tell Deepgram to open up a websocket. For our demo, we found that using the “phonecall” model in the “enhanced” tier gave us really good results, and we used the default Audio Connector format of “16000” for the sample rate and “linear16” for the audio format. Click here for information on Deepgram features and options. Also (and this is kind of the whole point here), we tell Deepgram to use diarization (“diarize: true”):
const deepgramLive = deepgram.transcription.live({
    punctuate: true,
    model: 'phonecall',
    tier: 'enhanced',
    language: “en - US”,
    ,
    diarize: true,
    encoding: 'linear16',
    sample_rate: 16000,
    endpointing: 10,
});We can then use that Deepgram connection to listen for transcription results (more on what we do with it later), by setting up a “listener”:
deepgramLive.addListener('transcriptReceived', async (transcription) => {
Ok, our plumbing is now all set up… time to turn on the spigot!
In the Audio Connector websocket, whenever we get an audio packet coming in from our room system (in other words, when the message type is “binary”), we first make sure that Deepgram is ready to receive data:
if ((deepgramLive.getReadyState() === 1)) {
And if it is, we simply pass the data along, as-is!
deepgramLive.send(msg);
Once Deepgram gets enough data to create the caption, it will call us back on the above-mentioned “listener”. Deepgram provides us with a whole lot of information regarding the transcribed audio (I strongly suggest looking through their excellent documentation to get a good feel for the richness of the information provided), but the part we most want for our room system diarization is the array of “words” (more specifically, the “punctuated_word”s, as we asked Deepgram to punctuate each sentence for us). Now, Deepgram diarization works on a per-word basis, able to differentiate even when there are overlapping speakers, so we want to look at each WORD and break them out by the individuals. We create an array where each entry will be “what that particular speaker said”, then iterate through the words, breaking out and re-composing by speaker:
let words = transcription.channel.alternatives[0].words
let message = [];


words.forEach(function each(word) {
    if (word.speaker in message) {
        message[word.speaker] += " " + word.punctuated_word
    } else {
        message[word.speaker] = word.punctuated_word
    }
});We now have message[0] with what the first speaker said, message[1] with what the second speaker said, etc.
And that’s it! We can send these messages back to the GUI, for it to display as appropriate.
Now we have a room system that takes meeting notes and handles multiple speakers, even if they are in the same room!
Click here to see a video of this demo in action!
You can also request a personal demo from one of our experts. If you have questions or feedback, join us on the Vonage Developer Slack or send us a Tweet on Twitter.
Mark has developed demos, implemented POCs, and inflicted his humor on unsuspecting colleagues at Vonage for over 4 years. He has been programming professionally since 1979, and his technical experience spans the gamut from FORTRAN on punched cards to React Native on the cloud. His creativity and enthusiasm for developing and sharing technology solutions is matched only by his penchant for Dad jokes.
