Network Registry
Please note: You may not be able to see this screen if Network Registry has not been enabled for your account. For more information, please contact Support.
To use the Network Features in production, you will need to register for approval to access Operator networks from one or more applications.
To streamline this process for you, this registration is managed with numerous operator partners behind the scenes for all supported Network Features, in any country made available. This process is dependent on each Operator’s approval, which may come through to the Network Registry at different times.
The Process
To start the Network Registry process, you must have a customer account; if you do not already have one, you can register your interest here.
Once you're logged in, go to the Build & Manage section and click on Network Registry to get started:
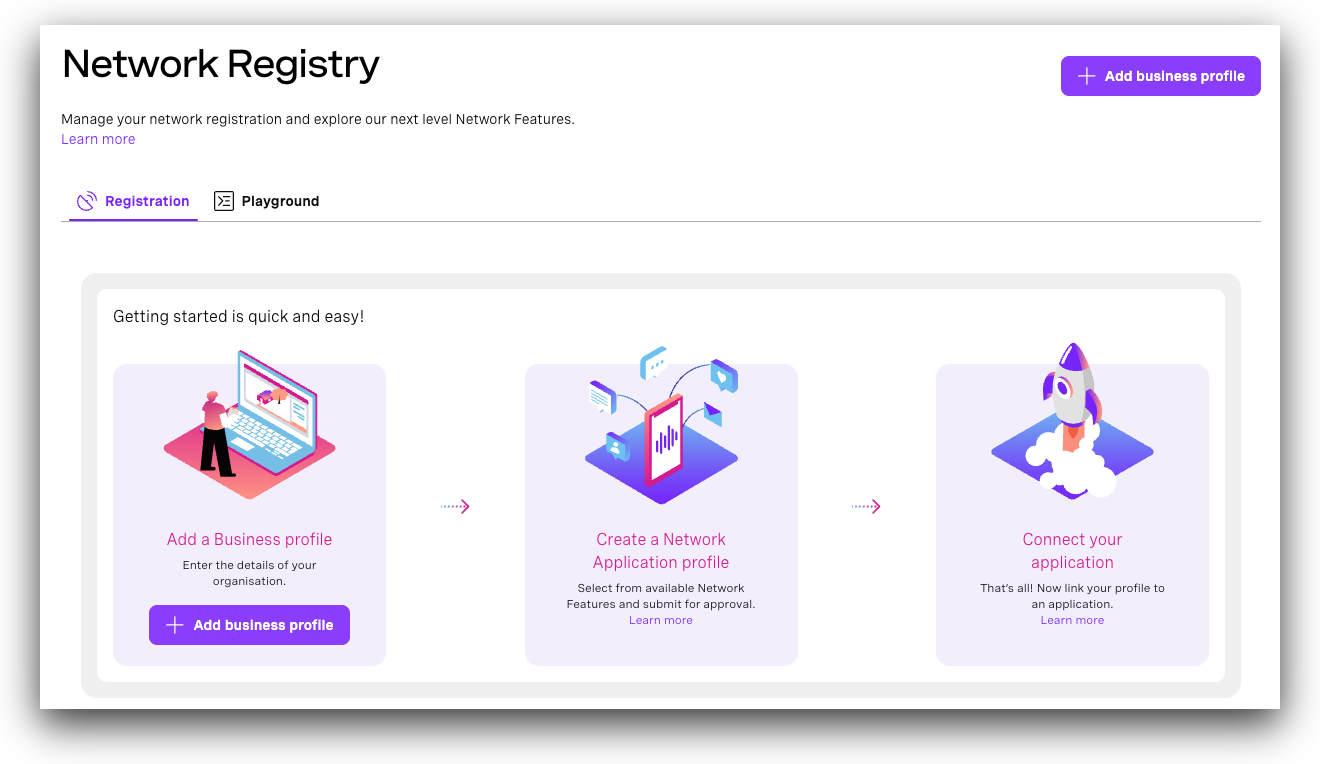
There are three main steps to complete your registration for the Network Features:
- Add a business profile: Tell us a little about the organization that owns the application.
- Create a Network Application profile: Select the Network Features you wish to use, describe your use case, and submit for approval.
- Connect your application: Link your profile to a new or existing Application for authentication.
Add Business Profile
A Business Profile helps Vonage and its operator partners know which organization owns each application using Network Features.
To ensure your registration is routed to the correct Operators, you'll first need to select where service is required by choosing from the list of available countries. Your registration will be shared with available Operators in each country you select. Available countries and Operators can be seen here.
Next, complete a business profile by providing more information about the organization that owns the applications. When filling out this section, you'll need the following information:
Business information:
- Please specify your role - the functional role you perform for, or your relationship with, the organization.
- Business Name - the name of the legal entity that owns the applications that will use Vonage Network Features.
- Business registered country - the country where the organization is registered.
- Business registration ID/number - If your organization has an additional registration you may include it here to simplify the process of validation.
- Organization type - select the most appropriate type from the dropdown list.
- Trading name - If different, include the name the organization trades under.
- Business Tax number - the tax reference for the organization in the registered country will be used by Vonage and Operators to validate the organization.
- Issuing Authority - If applicable, select from the list, or specify which authority issued your Business Registration ID.
Privacy details:
- Are you required by law to have a Data Protection Officer? - Select
Yes/Noif your organization is required by law to have or not a Data Protection Officer. - Is your Organization ISO 27001 certified? - Select
Yes/Noif your organization is certified or not. If not, but hold equivalent certificate, a State the equivalent certification if you have one field appears. Enter the name of the certificate, or leave it empty. - Privacy policy URL - Vonage and its Operator partners require that anyone using Network Features has a privacy policy, publicly available on the Internet - provide the address for the organization’s policy.
- Privacy Manager’s email address - include an email address that can be used for any questions relating to the privacy policy.
- Data Protection Officer’s email address - if required by law to have a DPO, include an email contact if it differs from that of the Privacy Policy Manager.
Bussiness Registered address:
Enter the registered address of the organization.
Once submitted you will see a summary of your Business Profile, through which you can view and track the status of your registration. You may receive email notifications when the status of your registration changes; notification settings can be changed here.
Create a Network Application Profile
Application profiles are used to enable one or more Network Features, describe a use case, and submit to Operators for approval. From the Business profile of the application owner, click the "Add application profile" button.
When filling out this section, you'll need the following information:
- Profile name - give the application a name to easily identify it.
- Category - select an application category from the drop down list.
- Infrastructure locations - select all countries where you may process personal data related to the use of requested Network Features.
- Select Network Features - select one or more Network Features that you may want to use.
- Use case description - describe your application from a consumer's point of view. Include an explanation of how the selected Network Features will help the application meet the selected purpose.
- Purpose - for each Network Feature selected, confirm the purpose from the drop down list, e.g. “Fraud Prevention and Detection”.
- Purpose Reason - explain how the selected network features will help your application meet the selected purpose.
- Privacy policy URL - provide the address for the organization’s policy.
- Terms and Conditions URL - provide the URL of the online terms and conditions for your application.
Once submitted, you will see an updated summary, including Network Application profiles. You may receive email notifications when your application status changes; notification settings can be changed here.
Please note: your application profile cannot be edited once it is created. If you need to change any of the information provided, please resubmit the form to create a new application profile. Once this has been approved and any traffic has been transferred to the new profile, you can safely delete the original application profile.
Connect your Vonage Application
Once your registration is approved by at least one Operator, you can link it to one or more Vonage Applications to start using Network Features. The Vonage application contains the credentials needed to make API calls.
Note: You can use the Playground to access Network Features for testing purposes, while waiting for approval.
Navigate to the Applications page on the dashboard and click 'Create a new application', then follow these steps:
- Name - Give a name to your application.
- Authentication - Either provide your own keys, or click on "Generate public and private key" to generate the keys needed during the authentication process; a new public key will appear on the text box, while your browser will automatically download the private key.
- API key - application is connected to your account API key.
- Under the privacy section, enable "Artificial intelligence" to allow use of data for AI training.
- Under the capabilities section, enable "Network Registry" and select the access type required: Playground or Production.
- For more information about testing from the Vonage Network Registry Playground, see here.
- For Production access, select the business profile and the application profile you created in the previous steps.
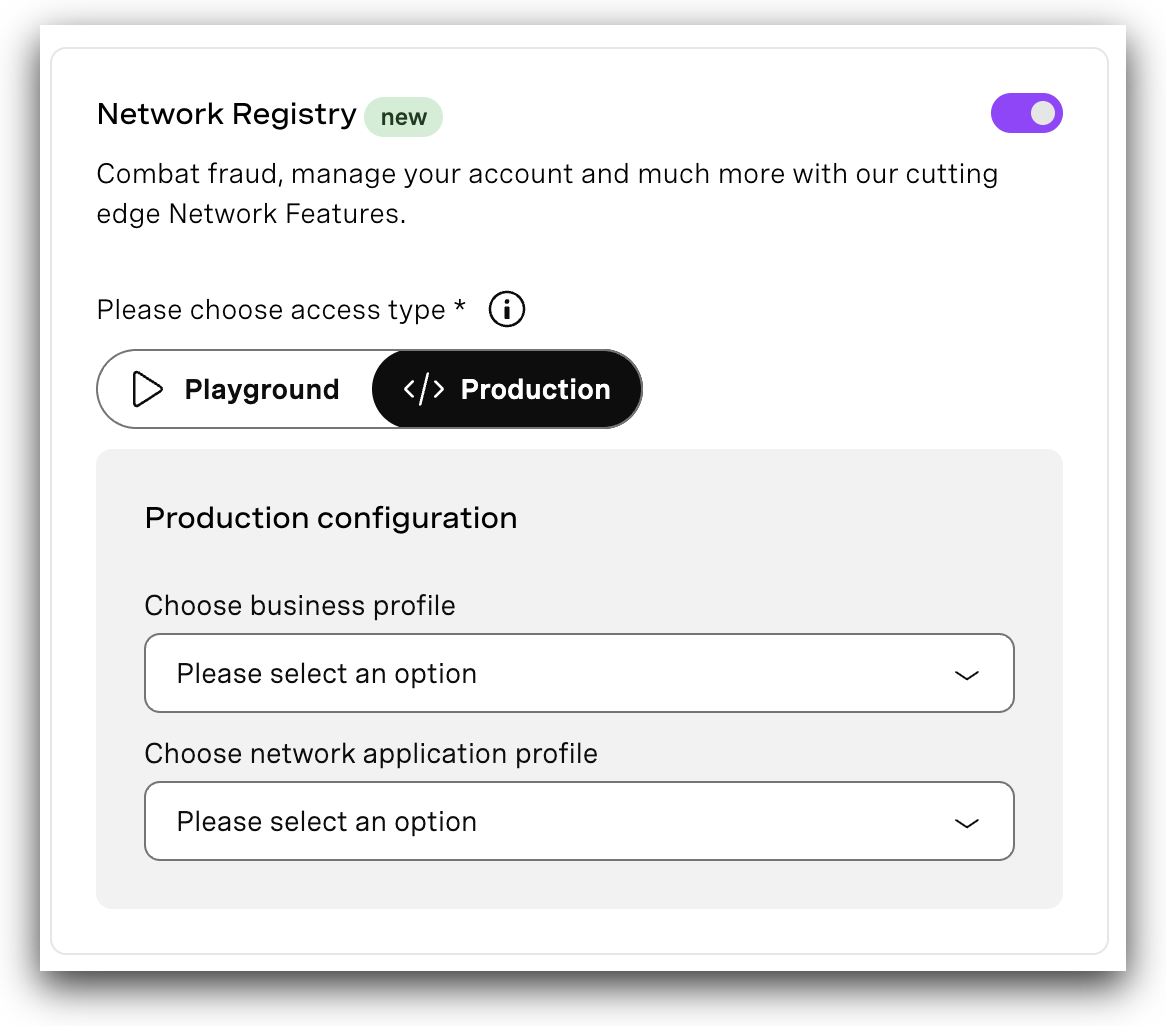
You may be prompted to configure options depending on the Network Features included in your registration.
Managing Your Registrations
Registration Status
To see the status of your Network Feature Registration, navigate to API Dashboard→Network Registry.
Select a Business Profile and expand the Application profile to show status from each of Vonage’s operator partners in the countries you selected.
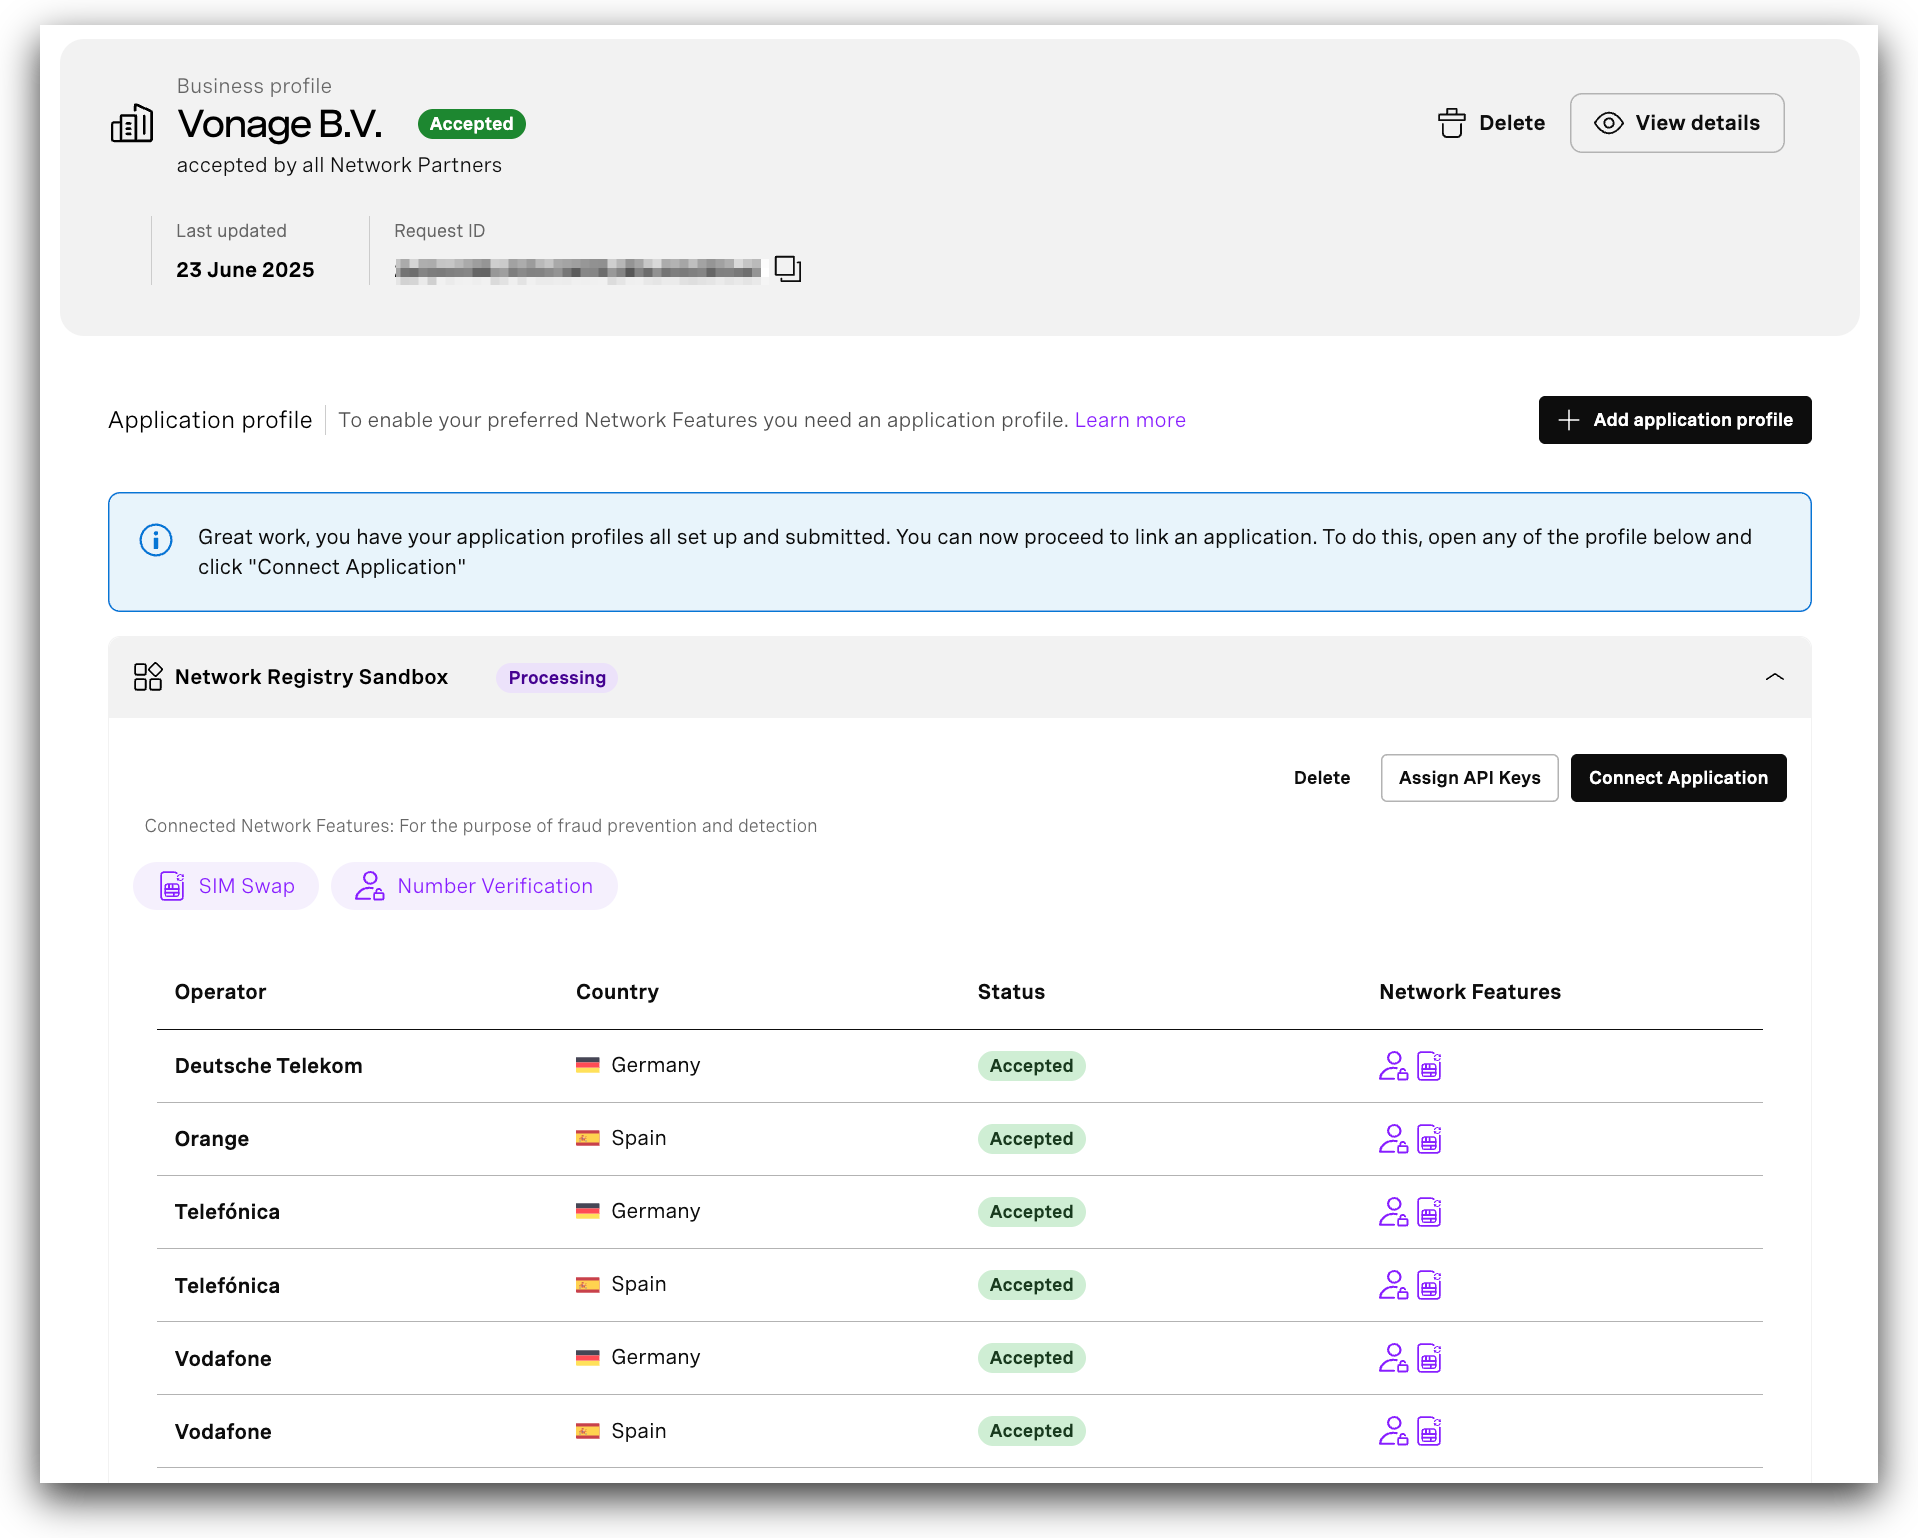
There are a number of states that registration components can be in, which can vary between components and between each of Vonage’s operator partners at any given time. Expanded views will include a summary description of each state:
- PENDING: received, pending approval
- NOT-SUBMITTED: not yet submitted to Operator
- PROVISIONING: submitted to Operator
- ACCEPTED: accepted by Operator
- PARTIALLY-ACCEPTED: accepted by some Operators, rejected by others
- REJECTED: rejected by Operator
- FAILED*: submission to Operator unsuccessful
* Failed submissions will be retried by Vonage. You do not need to notify us unless the problem persists.
In a Production mode, Network Feature requests will only be forwarded to an Operator if sent from an Application linked to a profile that has been accepted by that Operator.
Using Multiple API Keys
When an application profile is created, it is owned by the active key you were using in the dashboard. While this key cannot be edited, you can assign other API Keys to your application profile to enable approved Network Features across your account.
To do so, navigate to the application profile you want to assign keys to and select the Assign API Keys button. Once clicked, you'll see a list of API keys from your account:
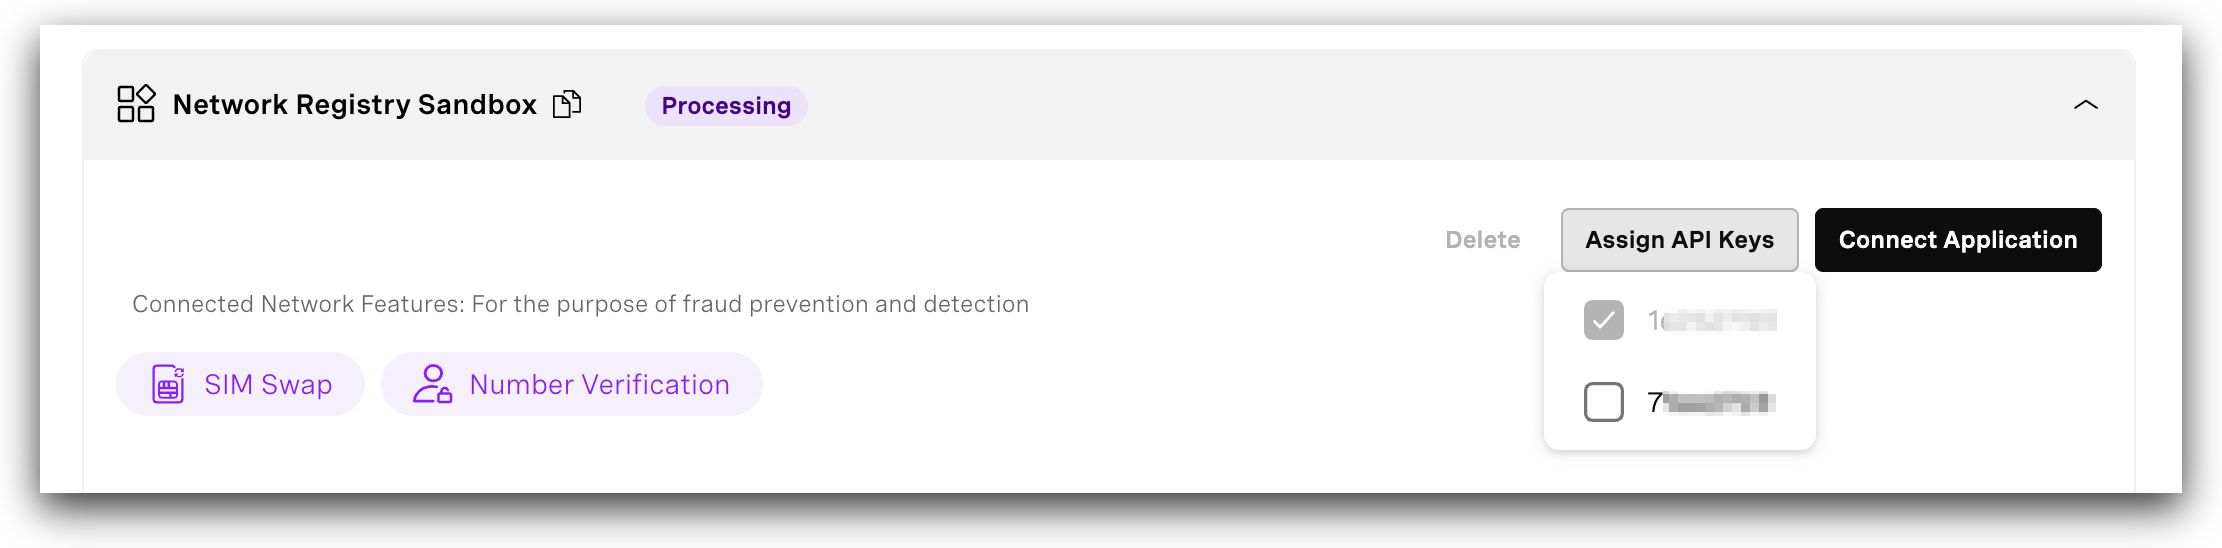
The first key in the drop down will be the key that owns the application profile - this cannot be changed. The other keys in the list will be any other API keys in the same account as that owning key. To assign, or unassign another API Key, select it in the dropdown. When creating an application using the network features approved in your application profile, you'll be able to use any of the API keys selected in the list.
Please note that you will not be able to de-select an API key in the list if it has any network feature enabled applications associated with it. Attempting to de-select the key will show an error requesting that you re-configure any associated applications before trying again.
Notifications
When a Network Feature Registration is first submitted, you will be subscribed to status change notifications. At any time, you can unsubscribe, or change notification settings by navigating to Vonage API Dashboard→API Settings→Notifications
Next Steps
Once you've registered and have been approved, you are ready to start using the APIs!