Verify API
The Verify API enables you to confirm that you can contact a user at a specific number, so that you can:
- Reach your users at any time, by ensuring that you have their correct phone number
- Protect against fraud and spam, by preventing one user from creating multiple accounts
- Add an extra layer of security to help confirm a user's identity when they want to perform certain activities
How it works
Verification is a two-stage process that requires two API calls:
Verification request
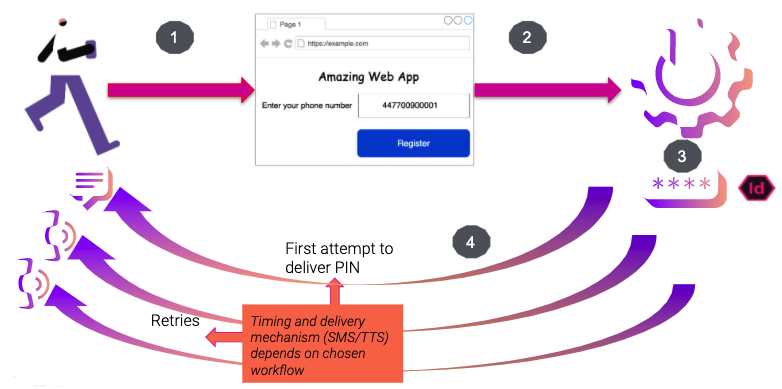
A user registers for your service via your app or web site and provides a phone number.
To confirm that the user has access to the number that they have registered with, your application makes an API call to the Verification request endpoint.
The Verify API generates a PIN code, with an associated
request_id.It is possible to supply your own PIN code in some circumstances, please contact your account manager.
The Verify API then attempts to deliver this PIN to the user. The format (SMS or Text-to-speech (TTS)) and timing of these attempts are defined by your chosen workflow. If the user does not revisit your app or website to enter the PIN they have received, the verification request will ultimately time out. Otherwise, you need to verify the number that they entered by performing a Verification check.
Verification check
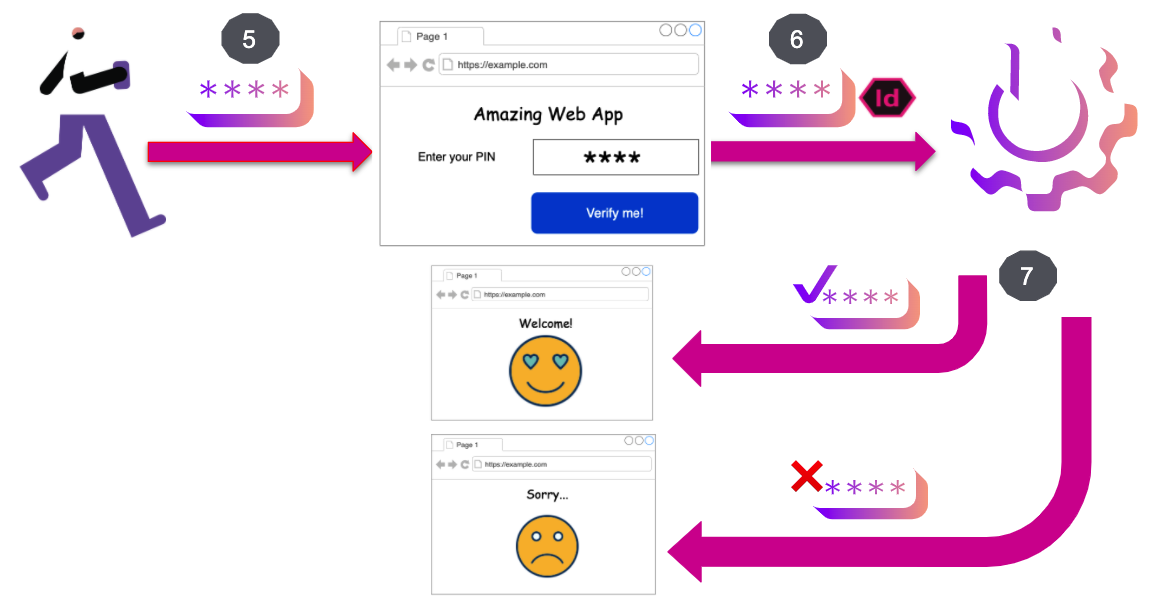
5. The user receives the PIN and enters it into your application.
6. Your application makes an API call to the Verification check endpoint, passing in the request_id and the PIN that the user entered.
7. The Verify API checks that the PIN entered matches the one that was sent and returns the result to your application.
Getting Started
The following sample shows you how to start the verification process by sending a verification code to a user. To learn how to validate the code the user supplies and perform other operations, see the Code Snippets.
Write the code
Add the following to send-verification-code.sh:
curl GET "https://api.nexmo.com/verify/json?api_key=$VONAGE_API_KEY&api_secret=$VONAGE_API_SECRET&number=$VERIFY_NUMBER&brand=AcmeInc"Run your code
Save this file to your machine and run it:
Prerequisites
Add the following to build.gradle:
implementation 'com.vonage:server-sdk-kotlin:2.1.1'Create a file named StartVerification and add the following code to the main method:
val client = Vonage {
    apiKey(VONAGE_API_KEY)
    apiSecret(VONAGE_API_SECRET)
}Write the code
Add the following to the main method of the StartVerification file:
val response = client.verifyLegacy.verify(VERIFY_NUMBER, VERIFY_BRAND_NAME)
if (response.status == VerifyStatus.OK) {
    println("Verification sent. Request ID: ${response.requestId}")
}
else {
    println("Error: ${response.errorText}")
}Run your code
We can use the application plugin for Gradle to simplify the running of our application. Update your build.gradle with the following:
apply plugin: 'application'
mainClassName = project.hasProperty('main') ? project.getProperty('main') : ''
Run the following gradle command to execute your application, replacing com.vonage.quickstart.kt.verify.legacy with the package containing StartVerification:
Prerequisites
Add the following to build.gradle:
implementation 'com.vonage:server-sdk:9.3.1'Create a file named StartVerification and add the following code to the main method:
VonageClient client = VonageClient.builder()
        .apiKey(VONAGE_API_KEY)
        .apiSecret(VONAGE_API_SECRET)
.build();Write the code
Add the following to the main method of the StartVerification file:
VerifyResponse response = client.getVerifyClient().verify(VERIFY_NUMBER, VERIFY_BRAND_NAME);

if (response.getStatus() == VerifyStatus.OK) {
    System.out.printf("RequestID: %s", response.getRequestId());
}
else {
    System.out.printf("ERROR! %s: %s", response.getStatus(), response.getErrorText());
}Run your code
We can use the application plugin for Gradle to simplify the running of our application. Update your build.gradle with the following:
apply plugin: 'application'
mainClassName = project.hasProperty('main') ? project.getProperty('main') : ''
Run the following gradle command to execute your application, replacing com.vonage.quickstart.verify with the package containing StartVerification:
Prerequisites
Install-Package VonageCreate a file named SendVerificationRequest.cs and add the following code:
using System.Threading.Tasks;
using Vonage.Verify;
using Vonage;Add the following to SendVerificationRequest.cs:
var credentials = Credentials.FromApiKeyAndSecret(vonageApiKey, vonageApiSecret);Write the code
Add the following to SendVerificationRequest.cs:
var request = new VerifyRequest() { Brand = brandName, Number = recipientNumber };Prerequisites
composer require vonage/clientCreate a file named request.php and add the following code:
Run your code
Save this file to your machine and run it:
Prerequisites
pip install vonage python-dotenvWrite the code
Add the following to request.py:
from vonage import Auth, Vonage
from vonage_verify_legacy import StartVerificationResponse, VerifyRequest

client = Vonage(Auth(api_key=VONAGE_API_KEY, api_secret=VONAGE_API_SECRET))

request = VerifyRequest(number=VERIFY_NUMBER, brand='AcmeInc')

response: StartVerificationResponse = client.verify_legacy.start_verification(request)
print(response)Run your code
Save this file to your machine and run it:
Prerequisites
gem install vonageCreate a file named request.rb and add the following code:
Run your code
Save this file to your machine and run it:
Guides
- Verify Migration Guide: This guide will help you migrate from Verify Legacy to Verify.
- Authentication: Authentication with Verify API
- Verify Languages: The available languages for V2 of the Verify API
- Verify API Workflow: Verify API Workflow
- Template Management: How to use template management to send custom OTP messages with the Vonage Verify API
- Verify API Webhooks: A guide to webhooks and how they can be used with the Verify API.
- Silent Authentication: Silent Authentication with the Vonage Verify API
- Verify Anti-Fraud System: Verify's anti-fraud system
- Virtual Operator for Silent Authentication: An introduction to using the Virtual Operator feature within the Vonage Network APIs Playground with the Silent Authentication
- Network Unblock API: Learn what the Vonage Network Unblock API is and how to use it.
Code Snippets
- Cancel a verification request
- Check a verification code
- Create a Template
- Create a Template Fragment
- Delete a Template
- Delete a Template Fragment
- Get a Template
- Get a Template Fragment
- List Template Fragments
- List Templates
- Send verification request (with fallback option)
- Send verification request using Email
- Send verification request using Silent Authentication
- Send verification request using SMS
- Send verification request using Voice (TTS)
- Send verification request using WhatsApp
- Update a Template
- Update a Template Fragment